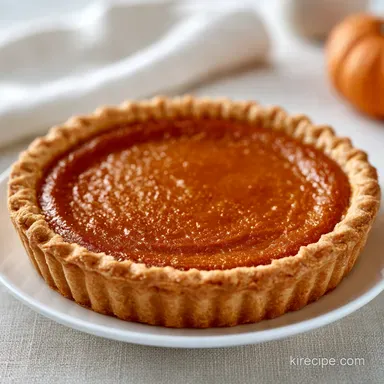
Old Fashioned Pumpkin Pie

- Time: 40 min active + 77 min baking + 1 hr chilling + 2 hrs cooling
- Flavor & Texture: Warmly spiced, dense custard in a shattering, buttery crust
- Perfect for: Autumn family gatherings and holiday dinners
The smell of cinnamon and cloves hitting the air is the first sign that autumn has actually arrived. For many, this dish is more than just a dessert, it's a cultural marker of the harvest season in North America.
It evolved from early European pumpkin puddings, moving from a savory-sweet mush into the refined, dark golden custard we recognize today.
You can expect a slice that holds its shape perfectly without being rubbery. The goal here is a balance between a crisp, flaky base and a filling that feels rich but not heavy.
The trick is in the timing and the temperature. By managing the heat precisely, you avoid the common issue of a soggy bottom or a cracked top.
Pumpkin Pie Texture Logic
- The Temperature Shift: Starting at 425°F (220°C) shocks the crust into setting its walls, while dropping to 350°F (180°C) prevents the filling from expanding too quickly and splitting.
- Stable Emulsion: Using evaporated milk instead of heavy cream creates a more stable protein network. This results in a cleaner slice and a filling that doesn't weep.
Depending on your pumpkin source, the moisture levels change. Canned puree is standardized, but fresh pumpkin varies by variety.
| Pumpkin Type | Prep Effort | Texture Impact | Best For |
|---|---|---|---|
| Canned Puree | Low | Consistent and smooth | Quick, reliable results |
| Fresh Roasted | High | Richer flavor, may be waterier | Those who want deep flavor |
If you go with fresh pumpkin, make sure to strain the puree through a fine-mesh sieve to remove excess water before adding it to the mix.
Your Tool Kit
For the crust, a food processor works, but using a pastry cutter or two forks is better for controlling butter size. You'll also need a 9-inch deep-dish pie pan and a set of pie weights (or dried beans) for the blind bake.
A digital thermometer is the most reliable way to check that the center is set without overbaking the edges.
The Grocery List
For the Homemade Pastry
- 1¼ cups (155g) all-purpose flour
- ½ teaspoon (3g) salt
- 1 tablespoon (12g) granulated sugar
- ½ cup (113g) unsalted butter, cold and diced The reason: Chilled fat creates steam pockets for a flakier crust
- 4 tablespoons (60ml) ice water
For the Filling
- 2 cups (450g) pumpkin puree
- ¾ cup (150g) brown sugar, packed
- 2 large eggs The reason: These provide the essential lift and structure
- 1 tablespoon (15ml) dark molasses The reason: Enhances the depth of flavor and creates a rich color
- 1 teaspoon (3g) ground cinnamon
- ½ teaspoon (2g) ground ginger
- ¼ teaspoon (1g) ground cloves
- ¼ teaspoon (1g) ground nutmeg
- ½ teaspoon (3g) salt
- 1¼ cups (300ml) evaporated milk The reason: More concentrated than regular milk, ensuring a stable set
Ensure all your ingredients are ready before you begin the dough to keep the butter from warming up.
What Each Ingredient Does
| Ingredient | Role | If You Don't Have It |
|---|---|---|
| Evaporated Milk | Stability & Texture | Whole milk + 1 tbsp melted butter (less stable) |
| Dark Molasses | Color & Earthiness | Maple syrup (lighter flavor, more liquid) |
| Chilled Butter | Flakiness | Vegetable shortening (more tender, less flavor) |
| Brown Sugar | Moisture & Sweetness | Granulated sugar (drier result) |
Timing and Yield
- Yield: 8 slices
- Prep time: 40 minutes
- Cook time: 1 hour 17 minutes
- Total time: 4 hours 57 minutes
- Internal Doneness: 160°F (71°C)
Making the Pie
Phase 1: Preparing the Shattering Crust
Preheat your oven to 425°F (220°C). In a bowl, combine 1¼ cups flour, ½ teaspoon salt, and 1 tablespoon granulated sugar.
Work ½ cup chilled, cubed butter into the flour mixture. Stop when it looks like coarse crumbs with some pea-sized pieces remaining. Note: Don't overwork the butter or the crust will be tough.
Add 3 to 4 tablespoons ice water, one tablespoon at a time. Stir just until the dough holds together. Form the dough into a disk, wrap in plastic, and refrigerate for 1 hour.
Roll the dough on a floured surface into a 12-inch circle. Ease it into a 9-inch deep-dish pie pan and trim the edges.
Line the raw crust with parchment paper and fill with pie weights. Bake at 425°F (220°C) for 12 minutes. Remove weights and parchment, then bake for another 5 minutes until the bottom is matte and pale gold.

Phase 2: Creating the Filling
In a large bowl, whisk together 2 cups pumpkin puree, ¾ cup brown sugar, 1 tablespoon dark molasses, 1 teaspoon cinnamon, ½ teaspoon ginger, ¼ teaspoon cloves, ¼ teaspoon nutmeg, and ½ teaspoon salt.
Beat in 2 large eggs one at a time until smooth. Note: Using pasteurized eggs can lower the risk for those sensitive to undercooked eggs.
Gradually stir in 1¼ cups evaporated milk until the filling is completely homogenous and glossy.

Phase 3: The Precision Bake
Pour the filling into the warm, blind-baked crust. Place the pie on the lower rack and bake at 425°F (220°C) for 15 minutes.
Reduce the oven temperature to 350°F (180°C). Bake for another 35 to 45 minutes until the edges are set and slightly puffed. The center should have a slight gelatinous jiggle, and the internal temperature must reach 160°F (71°C).

Phase 4: The Final Set
Remove from the oven and place on a wire rack. Let the pie cool completely at room temperature for at least 2 hours. This allows the custard to stabilize so you can get clean slices.
Quick Fixes
Fixing a Cracked Top
Cracks happen when the eggs overcook or the temperature drops too fast. To prevent this, pull the pie out as soon as that center jiggle appears. It will continue to firm up as it cools.
Preventing a Soggy Bottom
A pale, wet crust usually means the blind bake was skipped or the oven wasn't hot enough. Always bake the crust alone first. I like to leave the crust in for those extra 5 minutes after removing weights to ensure the bottom is matte.
Handling Watery Filling
If the filling looks separated or watery, the pumpkin puree likely had too much moisture. If you're using fresh pumpkin, roast it on a rack so the water drips away, then blend it and strain it before mixing.
Storage and Freezing
Loosely cover the cooled pie with plastic wrap. This version can be kept in the refrigerator for up to 4 days.
To freeze, wrap the completely cooled pie in plastic wrap and then a layer of aluminum foil. It lasts for up to 3 months. Thaw it in the refrigerator overnight before serving.
Enjoy it chilled or at room temperature. If you prefer it warm, warm a slice for 5 to 8 minutes at 300°F (150°C). Avoid the microwave, as it can make the custard rubbery.
Swaps and Variations
You can easily shift the flavor profile by changing the sweetener or adding a bit of zest. I like adding a pinch of ground cardamom for a more floral note.
| Original Ingredient | Substitute | Why It Works |
|---|---|---|
| Brown Sugar | Maple Syrup | Similar sweetness. Note: Reduces structural stability, may be softer |
| Evaporated Milk | Coconut Milk (Full Fat) | Much higher fat content. Note: Adds tropical flavor |
| Pumpkin Puree | Butternut Squash | Similar texture. Note: Lacks the specific pumpkin musk |
If you want a texture change, try adding 1/2 cup of chopped pecans to the bottom of the crust before adding the filling for a crunchy layer.
Best Pairing Ideas

The richness of the custard needs something bright or airy to balance it. A dollop of homemade whipped cream with a touch of vanilla is the classic choice. For something different, try a spoonful of sweetened mascarpone or a drizzle of maple syrup.
A side of tart cranberry sauce also cuts through the sweetness beautifully.
Your Questions, Answered
Does this recipe make enough for one pie or two, and is that regular or deep dish?
One 9-inch deep-dish pie. The dough is rolled into a 12-inch circle to fit this specific pan size.
Is evaporated milk or cream better in pumpkin pie?
Evaporated milk is recommended. It results in a more stable, homogenous, and glossy custard filling.
Can evaporated milk replace the eggs?
No, eggs are essential. They provide the structural bind that allows the filling to set properly during baking.
Why is the bottom crust pale when using a glass dish?
Glass conducts heat more slowly than metal. This slower transfer often results in a lighter-colored base even when fully cooked.
How to prevent the crust from turning out tough?
Work the chilled butter into the flour quickly. Stir only until the dough just holds together to avoid overdeveloping the gluten.
Old Fashioned Pumpkin Pie