Barefoot Contessa French Apple Tart: Shatter Crisp
- Time:15 minutes active + 25 minutes baking = Total 40 minutes
- Flavor/Texture Hook: Shatter crisp pastry with a velvety, mirrored apple glaze
- Perfect for: Autumn dinner parties or an impressive weekend brunch
The smell of melting butter and warming Granny Smith apples hitting a hot oven is basically the scent of October for me. I remember the first time I served this at a family gathering, and the room just went quiet for a second because it looked like something from a high end bakery in Paris.
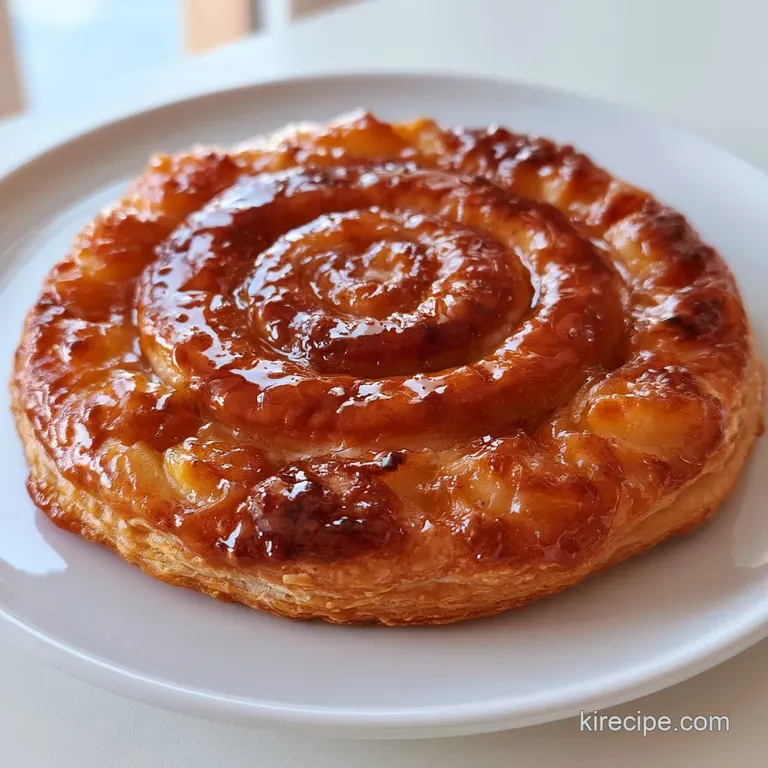
It's that specific, golden brown glow that makes everyone lean in.
But here's the thing: the magic isn't in some secret ingredient, it's in the precision of the assembly. I've seen people treat it like a casual pile of fruit, but when you treat the arrangement like a piece of art, the result is completely different.
You get these overlapping scales of apple that caramelize on the edges while staying tender in the middle.
Whether you're hosting a cozy night in or trying to impress some new in laws, the barefoot contessa french apple tart recipe is my go to. It's foolproof as long as you respect the temperature and the pastry, and it always feels more special than a standard apple pie.
The Barefoot Contessa French Apple Tart Recipe
The beauty of this dish is that it bridges the gap between a rustic galette and a formal tart. You don't need a fluted pan or a degree in pastry arts to get that professional finish. The key is the puff pastry, which provides a light, airy lift that keeps the dessert from feeling too heavy.
When you first pull this out of the oven, you'll notice the edges have a deep, mahogany color and the sugar has formed a thin, crackling crust over the fruit. It's the kind of dessert that looks like it took hours but actually comes together in under an hour.
To get the best results, make sure your oven is truly at temperature before the tray goes in. A lukewarm oven is the enemy of puff pastry, as you need that immediate blast of heat to turn the moisture in the butter into steam. This is what creates those distinct, flaky layers that shatter when you bite into them.
Secrets to a Perfect Tart
The reason this recipe works so well comes down to a few basic principles of heat and moisture. I'm a bit of a nerd about the "how" behind the bake, and understanding these points helps you avoid the common pitfalls.
Steam Expansion: The layers of butter in the frozen puff pastry evaporate instantly at 400°F (200°C), pushing the dough upward and creating a light, airy structure.
Sugar Caramelization: The granulated sugar doesn't just sweeten the fruit, it draws out a bit of moisture from the apples to create a concentrated syrup that browns in the oven.
Pectin Setting: The apricot jelly contains natural pectin which, when heated with Calvados, creates a viscous coating that seals in moisture and gives the tart its signature shine.
Tension Arrangement: By overlapping the apple slices in a tight spiral, you create a structural support system that prevents the pastry from bubbling up too much in the center.
| Feature | Fast Method (Puff Pastry) | Classic Method (Shortcrust) | Best For |
|---|---|---|---|
| Prep Time | 15 minutes | 45 minutes + chill | Quick entertaining |
| Texture | Airy and shatter crisp | Dense and buttery | Traditional pies |
| Effort | Minimal rolling | Rubbing butter into flour | Low stress baking |
Detailed Ingredient Breakdown
Precision in baking is everything. If you use an apple that's too soft, your tart will turn into a jammy mess. If your pastry isn't thawed correctly, it'll shrink and warp. Here is the breakdown of why these specific components are used.
| Ingredient | Science Role | Pro Secret |
|---|---|---|
| Puff Pastry | Structural Lift | Thaw just enough to be pliable, not soft |
| Granny Smith | Acid Balance | Slice to 3mm for uniform cooking |
| Granulated Sugar | Moisture Draw | Sprinkle evenly to avoid burnt "hot spots" |
| Apricot Jelly | Glaze Sealant | Strain through a sieve for zero lumps |
Essential Baking Gear
You don't need a professional kitchen for this, but a few specific tools make the process much smoother. I always use a large rimmed baking sheet so that any escaping butter or sugar doesn't drip onto the bottom of my oven and cause smoke.
Parchment paper is non negotiable here. Puff pastry can be sticky, and the sugar caramelization can essentially glue your tart to the pan if you aren't careful. A high-quality pastry brush is also essential for the butter and the final glaze, as it allows you to coat the fruit without disturbing the delicate arrangement.
For the apples, a mandoline is a great shortcut, but a sharp chef's knife works perfectly fine. The goal is consistency. If some slices are thick and others are thin, they will cook at different rates, leaving you with some crunchy spots and some mushy ones.
Step-by-step Baking Guide

Let's get into the actual process. Trust me on the arrangement phase, it's the most important part of the visual appeal.
- Preheat your oven to 400°F (200°C) and line a baking sheet with parchment paper. Note: A hot oven is critical for the pastry lift.
- Roll out the thawed puff pastry slightly on the parchment paper to fit your desired shape. Note: Don't over roll or you'll flatten the layers.
- Peel, core, and thinly slice your 7 Granny Smith apples.
- Arrange the apple slices in overlapping concentric circles, starting from the outer edge and spiraling inward. Note: Keep them tight to prevent the pastry from puffing up in the center.
- Melt 2 tbsp of unsalted butter and brush it gently over the top of the apples.
- Sprinkle 1/4 cup of granulated sugar evenly across the fruit.
- Bake for 20-25 minutes until the pastry edges are a deep golden brown and the apple edges are slightly caramelized.
- While the tart is baking, combine 2 tbsp apricot jelly and 1 tbsp Calvados in a small saucepan.
- Heat the glaze over medium heat until it is liquid and bubbling.
- Remove the tart from the oven and immediately brush the warm glaze over the apples for a mirrored finish.
Fixing Common Tart Errors
Even the best of us have bad bake days. I once made this and forgot to thaw the pastry properly, and the center stayed raw while the edges burned. It was a disaster, but it taught me the importance of temperature.
Soggy Pastry Bottom
This usually happens if the apples are too wet or the oven temperature is too low. According to King Arthur Baking, ensuring your oven is fully preheated is the best way to prevent a "soggy bottom" in tarts.
Apples Not Softening
If your apples are still too firm after 25 minutes, you likely sliced them too thick. The heat needs to penetrate the fruit quickly since the pastry cooks faster than the apple.
Glaze Not Sticking
If the glaze beads up or slides off, your tart has cooled down too much. You must apply the apricot mixture the second the tart leaves the oven while the fruit is still sizzling.
| Problem | Root Cause | Solution |
|---|---|---|
| Pale Crust | Oven too cold | Increase temp to 400°F (200°C) |
| Burnt Sugar | Too much sugar in one spot | Use a fine mesh shaker for sugar |
| Shrinking Pastry | Pastry too warm/soft | Chill the tray 10 mins before baking |
Mistakes Checklist:
- ✓ Checked that the oven reached 400°F before loading.
- ✓ Sliced apples to a consistent, thin width.
- ✓ Thawed puff pastry but kept it cool to the touch.
- ✓ Applied glaze while the tart was piping hot.
- ✓ Used parchment paper to prevent sticking.
Tasty Flavor Twists
Once you've mastered the barefoot contessa french apple tart recipe, you can start playing with the flavors. I love adding a pinch of cinnamon or cardamom to the granulated sugar for a warmer, spicier profile. It doesn't change the science of the bake, but it adds a layer of depth.
If you want to go really fancy, you can add a thin layer of almond cream (frangipane) to the pastry before adding the apples. This creates a velvety barrier that protects the crust from moisture and adds a nutty flavor. For those who want a different kind of indulgence, you might pair this with a side of Black Label Chocolate Sauce for a decadent dessert platter.
You can also swap the Calvados for a splash of lemon juice or orange liqueur if you don't have apple brandy on hand. The acidity is what cuts through the sweetness of the apricot jelly and the butter.
Decision Shortcut:
- Want it tangier? Use a mix of Granny Smith and Braeburn apples.
- Want it sweeter? Add 1 tbsp of maple syrup to the butter brush.
- Want it extra glossy? Double the apricot jelly and strain it twice.
Keeping Your Tart Fresh
This tart is best served warm, but it keeps surprisingly well if stored correctly. The puff pastry will lose some of its shatter crisp quality over time as it absorbs moisture from the apples, so reheating is key.
Store leftovers in an airtight container at room temperature for up to 2 days, or in the fridge for up to 5 days. I don't recommend freezing the finished tart, as the glaze can become grainy and the pastry often loses its structure.
To reheat, avoid the microwave at all costs. It will make the pastry chewy and rubbery. Instead, pop a slice into a 350°F (180°C) oven for 5-8 minutes. This crisps the bottom back up and makes the glaze velvety again.
For zero waste, don't throw away those apple peels. You can simmer them with a bit of water and cinnamon to make a light apple tea, or simply toss them in the compost bin.
Serving Your Finished Tart
The presentation is half the battle with this recipe. I love serving it with a dollop of crème fraîche or a scoop of high-quality vanilla bean ice cream. The cold cream against the warm, caramelized apples is a fantastic contrast.
Since this is such a refined dessert, I usually pair it with something light for the rest of the meal. For a full party menu, I might start with something bold, like a prime rib paired with Ina Garten Horseradish Sauce, and then end the night with this apple tart. It cleanses the palate and leaves everyone feeling satisfied without being overly stuffed.
Slice the tart into wedges using a serrated knife to avoid crushing the delicate pastry layers. If you're serving it at a party, leave it on the baking sheet for a few minutes to set before transferring it to a wooden board for that rustic, French countryside vibe.
Recipe FAQs
How to make the perfect French apple tart?
Arrange apple slices in tight, overlapping concentric circles starting from the outside and working inward. Brush with melted butter and sugar, then bake at 400°F for 20-25 minutes until the pastry is deep golden brown.
What dessert Ina Garten calls the best recipe she's ever developed?
The French Apple Tart. She prizes this recipe for its simplicity and the professional mirrored finish created by the apricot jelly and Calvados glaze.
What are common apple tart baking mistakes?
Over rolling the puff pastry. This flattens the delicate layers and prevents the crust from achieving its signature lift. Using an oven temperature lower than 400°F can also lead to a soggy base.
Is it true that any apple variety works for this tart?
No, this is a common misconception. Granny Smith apples are essential because their tart flavor balances the granulated sugar and they hold their shape during the high heat bake.
Can I add nuts to the topping for extra crunch?
No, stick to the original sugar and butter. Heavy toppings can weigh down the apple slices and disrupt the glaze. If you enjoy using chopped almonds in other recipes, serve them on the side instead.
Why is my tart crust not rising?
Ensure your oven is preheated to exactly 400°F. High initial heat is critical to trigger the steam that pushes the puff pastry layers upward.
How should I store the leftovers?
Keep slices in an airtight container in the refrigerator. While the glaze preserves the fruit, the pastry is best revived by heating it in a warm oven before serving.
French Apple Tart Recipe

