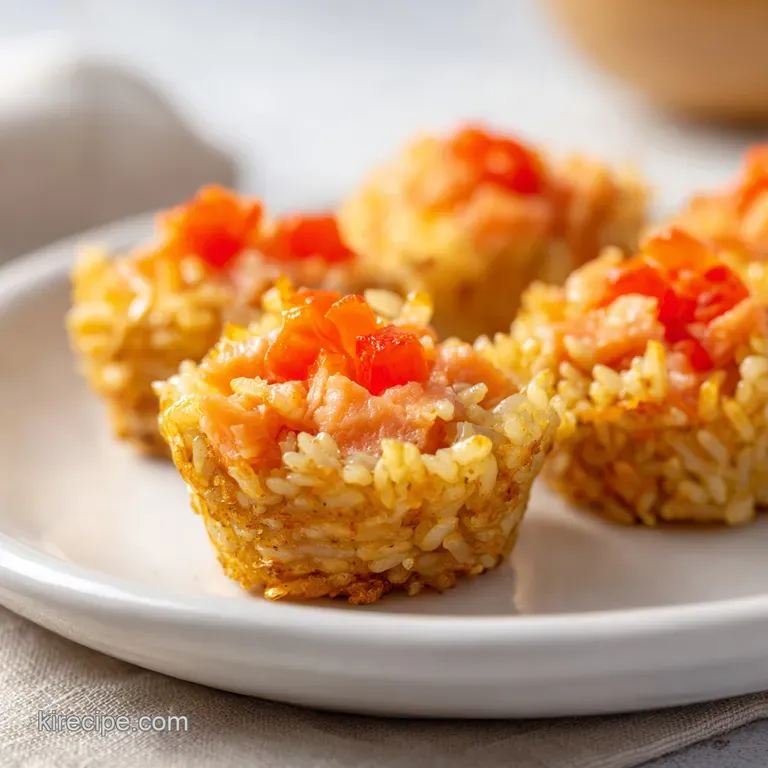
Sushi Cups: Crispy and Golden
- Time: 10 min active + 15 min bake = 25 min total
- Flavor/Texture Hook: Golden, shatter crisp rice base with velvety, spicy salmon
- Perfect for: Low effort party appetizers or high protein snacks
- The Secret to Crispy Sushi Cups
- The Texture Logic
- Fresh Ingredients Needed
- Required Kitchen Tools
- Step by Step Method
- Solving Common Errors
- Flavor Tweaks and Swaps
- Precision Checkpoints
- Budget and Batch Adjustments
- Dispelling Common Beliefs
- Storage and Waste Tips
- Best Pairing Suggestions
- Recipe FAQs
- 📝 Recipe Card
That sound is what I live for, the distinct, metallic crackle of the rice base pulling away from the pan. When you first pull these out, the aroma is exactly like a high end sushi bar, but with this toasted, nutty scent that only comes from oven crisped starch.
It's the kind of smell that makes everyone in the house wander into the kitchen asking what's happening.
I used to struggle with traditional rolls, always ending up with rice that was too loose or seaweed that tore. Then I realized I could just use a muffin tin to create a structural base. These Sushi Cups take the stress out of the shaping process while keeping all the fresh, fuel providing ingredients we love.
You're going to get a contrast that's honestly hard to beat, a warm, crispy shell topped with chilled, creamy salmon. It's a balanced bite that hits every taste bud, from the acidity of the rice vinegar to the kick of Sriracha. Let's get into how to make this happen.
The Secret to Crispy Sushi Cups
The magic of this dish is all about the transition of the rice from a soft, sticky mass to a rigid, crunchy cup. By pressing the rice into a greased tin and hitting it with 400°F (200°C) heat, we are triggering a process where the surface moisture evaporates rapidly, and the outer layer of starch toasts in the oil.
Starch Setting: The warm rice is packed tight, which minimizes air pockets and allows the heat to penetrate evenly, creating a solid wall.
Oil Conduction: The neutral oil in the muffin tin acts as a heat conductor, effectively shallow frying the exterior of the rice.
Vinegar Balance: The sugar and vinegar in the seasoning don't just add flavor, they help the rice caramelize slightly, giving that deep golden color.
Moisture Control: Because we bake them quickly at a high temp, the inside stays slightly chewy while the outside becomes a shell.
| Method | Time | Texture | Best For |
|---|---|---|---|
| Muffin Tin (Fast) | 25 mins | Shatter crisp shell | Parties, quick snacks |
| Hand Rolled (Classic) | 60 mins | Soft, cohesive wrap | Traditional dinner |
| pan-fried Disc | 40 mins | Flat, crunchy bottom | Plated appetizers |
The Texture Logic
When you're working with short grain rice, you're dealing with high amylopectin levels, which is what makes it sticky. To get that specific crunch, we need to manipulate that stickiness. If the rice is too wet, it steams rather than fries, leaving you with a gummy base.
The goal is to reach a point where the edges are deep golden brown. This happens when the sugars in the rice vinegar seasoning and the natural starches react to the intense heat of the oven. I've found that 400°F (200°C) is the sweet spot, as anything lower results in a dry rice cake rather than a crispy cup.
According to Serious Eats, the way you rinse your rice affects the final starch content, which is crucial here. We want enough starch for the cups to hold their shape, but not so much that they become a heavy paste.
| Ingredient | Science Role | Pro Secret |
|---|---|---|
| Sushi Rice | Structural Base | Use warm rice for better vinegar absorption |
| Rice Vinegar | pH Balance | Adds acidity that cuts through the fatty salmon |
| Kewpie Mayo | Emulsifier | Higher egg yolk content creates a silkier texture |
Fresh Ingredients Needed
For the base of the Sushi Cups, you'll need these specific items. I've listed the weights because that's how I avoid the "too much rice" mistake I made early on.
For the Crispy Base
- 2 cups (370g) cooked sushi rice, warmWhy this? High starch content for structure
- 3 tbsp (45ml) rice vinegarWhy this? Essential for authentic tang
- 1 tbsp (12g) granulated sugarWhy this? Aids in caramelization
- 1/2 tsp (3g) saltWhy this? Enhances all other flavors
- 2 tbsp (30ml) neutral oil (like avocado or grapeseed)Why this? High smoke point
For the Salmon Filling
- 8 oz (225g) sushi grade salmon, finely dicedWhy this? Rich in Omega-3s and fuel
- 3 tbsp (45ml) Kewpie mayonnaiseWhy this? Creamier than standard mayo
- 1 tbsp (15ml) SrirachaWhy this? Adds controlled heat
- 1 tsp (5ml) soy sauceWhy this? Deep umami baseline
- 1/4 tsp (1.2g) garlic powderWhy this? Subtle aromatic depth
For the Garnish
- 1/4 cup (15g) sliced scallions
- 1 tbsp (8g) black sesame seeds
- 1 ripe avocado, diced
- 3 sheets of nori, cut into small circles
| Original Ingredient | Substitute | Why It Works |
|---|---|---|
| Sushi grade Salmon | Sushi grade Tuna | Similar fat content. Note: Tuna has a leaner, more metallic taste |
| Kewpie Mayo | Avocado Oil Mayo | Similar creaminess. Note: Lacks the slight sweetness of Kewpie |
| Rice Vinegar | Apple Cider Vinegar | Similar acidity. Note: Adds a fruitier, sharper note |
| Soy Sauce | Coconut Aminos | Lower sodium. Note: Slightly sweeter and less salty |
Required Kitchen Tools
You don't need a professional sushi kit for this, but a few specific tools make the process much smoother. The most important one is the mini muffin tin, as the smaller size ensures the rice to topping ratio is balanced.
I recommend a non stick mini muffin tin, but if you have a standard metal one, just be generous with the neutral oil. A small mixing bowl is necessary for the salmon mixture to ensure the Kewpie and Sriracha are fully incorporated without overworking the fish.
For the nori circles, a small circular cookie cutter or even the rim of a shot glass works brilliantly to get those clean, professional edges. Trust me, the visual difference is huge.
Step by step Method
Let's get these Sushi Cups moving. The process is divided into the base, the filling, and the final assembly.
Phase 1: Seasoning and Pressing
- Fold the rice vinegar, sugar, and salt into the warm cooked rice. Mix gently until the grains are glossy and the seasoning is evenly distributed. Note: Use a folding motion to avoid smashing the grains.
- Lightly grease a mini muffin tin with neutral oil.
- Spoon about 1.5 tbsp of rice into each cup. Press down firmly with the back of a spoon to create a flat bottomed cup. Note: Ensure the sides are pressed firmly against the tin to prevent collapse.
Phase 2: The Crisping Stage
- Bake in the oven at 400°F (200°C) for 12-15 minutes. Wait until the edges are deep golden brown and you can smell the toasted rice.
- Remove from the oven and let them cool for 2 minutes. Note: This resting period allows the structure to set, making them easier to pop out.
Phase 3: Assembly and Topping
- In a mixing bowl, fold together the diced salmon, Kewpie mayo, Sriracha, soy sauce, and garlic powder. Mix until the texture is velvety and a consistent pale orange color.
- Place one small nori circle at the bottom of each cooled rice cup. Note: This acts as a moisture barrier between the rice and the fish.
- Spoon a generous dollop of the salmon mixture into each crispy rice cup.
- Top with a cube of avocado, a sprinkle of sesame seeds, and a slice of scallion.
Solving Common Errors

Even with a simple recipe, things can go sideways. Usually, it's a matter of temperature or moisture.
Rice Sticking to the Pan
If your rice is fused to the tin, it's usually because the oil didn't cover the sides or the rice was removed too early. The rice needs to fully "fry" and release from the metal. Try using a thin offset spatula to gently nudge the edges.
Runny Salmon Filling
A watery filling usually happens if the salmon wasn't patted dry before dicing or if too much soy sauce was added. The Kewpie mayo should act as the binder, keeping everything tight.
Base Collapsing
If the cups crumble when you lift them, the rice wasn't pressed firmly enough during Phase 1. You want a dense pack, not a loose scoop.
| Problem | Root Cause | Solution |
|---|---|---|
| Sticky Base | Under greased tin | Use an oil spray for total coverage |
| Soggy Rice | Too much filling | Add the nori barrier and serve immediately |
| Bland Taste | Under seasoned rice | Increase vinegar/salt ratio in the warm rice |
Mistake Proof Checklist
- ✓ Use warm rice, not cold, for the base.
- ✓ Press the rice with significant force into the tin.
- ✓ Don't skip the 2 minute cooling period.
- ✓ Pat salmon dry with paper towels before mixing.
- ✓ Ensure the oven is fully preheated to 400°F (200°C).
Flavor Tweaks and Swaps
While salmon is the classic, these Sushi Cups are incredibly versatile. You can easily pivot the protein to match what's fresh at the market or your dietary needs.
For those wanting a seafood alternative, shrimp sushi cups are a fantastic choice. Just dice cooked shrimp and add a squeeze of lime juice to the filling to brighten the flavor. If you're leaning toward something more intense, tuna sushi cups with a bit of toasted sesame oil in the mix are a winner.
If you want to go the vegetarian route, diced firm tofu or marinated tempeh works surprisingly well. I suggest adding a touch of smoked paprika to the tofu to mimic that savory depth we get from the salmon.
Decision Shortcut
- If you want more heat, add a pinch of cayenne or extra Sriracha.
- If you want a fresher profile, swap scallions for micro cilantro.
- If you want a crunchier topping, use toasted panko instead of sesame seeds.
| Option | Protein | Flavor Profile | Best Garnish |
|---|---|---|---|
| Seafood | Shrimp | Bright, light | Lemon zest |
| Vegan | Avocado/Tofu | Creamy, earthy | Toasted almond |
| Bold | Spicy Tuna | Sharp, punchy | Jalapeño slice |
Precision Checkpoints
- 1. The Gloss Factor
- After mixing the vinegar into the rice, the grains should look shiny and wet, not matte.
- 2. The 13 Minute Mark
- At 13 minutes in the oven, check the edges. If they aren't deep golden, give them another 2 minutes.
- 3. The Fill Level
- The salmon mixture should sit just slightly above the rim of the rice cup, creating a small dome.
Budget and Batch Adjustments
When you're making these for a crowd, you can't just double everything blindly. Some ingredients behave differently when scaled.
Scaling Down (1/2 Batch) If you're only making 6 cups, use a smaller baking sheet or just fill half the tin. Reduce the bake time by about 20%, checking them at 10 minutes, as a half full tin often heats up faster. For the egg based mayo, just use the proportional amount.
Scaling Up (2x-4x Batch) When doubling the recipe for a big party, be careful with the salt and Sriracha. I recommend increasing those to only 1.5x the original amount and tasting before adding more. Liquids can become overpowering in larger batches.
Work in batches for the baking process to ensure the oven temperature doesn't drop too much when you open the door.
If you're baking 24-48 cups at once, lower the oven temp to 375°F (190°C) and extend the time by 5 minutes. This prevents the outside from burning before the center of the crowded tin gets crispy.
Dispelling Common Beliefs
There's a lot of noise about sushi, but let's clear a few things up. First, the idea that you need specialized "sushi rice" is a bit of a myth. While short grain Japanese rice is best, any high starch short grain rice will work if you rinse it well to remove excess surface starch.
Another common misconception is that raw fish is always risky. Using "sushi grade" fish means it has been flash frozen to a temperature that kills parasites, making it safe for raw consumption. Just make sure you're buying from a reputable source.
Finally,, some people think the rice must be cold before filling. Actually, the contrast of the slightly warm, crispy rice and the chilled salmon is what makes these Sushi Cups so satisfying.
Storage and Waste Tips
Since these have raw fish and crispy rice, they are best eaten immediately. However, if you have leftovers, store them in an airtight container in the fridge for up to 2 days. Note that the rice will lose its shatter crisp texture and become more like a traditional sushi roll.
To reheat, don't use a microwave, as it will cook the raw salmon. Instead, pop the rice bases in a toaster oven for 3 minutes if you've prepped them without the filling.
For zero waste, don't throw away the nori scraps. Crumble them into a salad or use them as a garnish for a bowl of steamed rice. Any leftover avocado can be mashed into a quick spread for toast the next morning with a dash of the same soy sauce used in the recipe.
Best Pairing Suggestions
To keep the meal balanced and nutritious, I like to pair these Sushi Cups with light, refreshing sides. Edamame steamed with a pinch of sea salt provides a great protein boost and a different kind of chew.
A chilled cucumber salad with rice vinegar and sesame oil mirrors the flavors in the rice base and cleanses the palate between the rich salmon bites. For a drink, a hot cup of genmaicha (brown rice tea) is the ultimate match, as the toasted rice notes in the tea complement the toasted rice of the cups.
If you're serving this as a full meal, a simple miso soup with silken tofu and wakame seaweed adds a comforting, warm element that rounds out the experience. It turns a few appetizers into a complete, fuel filled Japanese inspired feast.
Recipe FAQs
Can I store these in the fridge?
Yes, for up to 2 days. Use an airtight container, but be aware the rice will lose its shatter crisp texture and become more like a traditional roll.
How to stop the rice from sticking to the muffin tin?
Lightly grease the tin with neutral oil. This creates a barrier that allows the cups to release easily after baking.
Is it true that these rice cups must be deep fried to be crispy?
No, this is a common misconception. Baking them at 400°F (200°C) for 12 15 minutes creates the deep golden brown, crispy edges.
How to ensure the rice cups don't collapse?
Press down firmly with the back of a spoon. Creating a compact, flat bottomed cup ensures the base is stable enough to hold the filling.
Can I reheat the assembled cups in the microwave?
No, avoid the microwave. Heating this way will cook the raw salmon; use a toaster oven for 3 minutes if reheating rice bases without filling.
How to prepare the salmon filling for a velvety texture?
Fold diced salmon, Kewpie mayo, Sriracha, soy sauce, and garlic powder together. Mix gently until the ingredients are fully incorporated and smooth.
Do the rice cups need to cool before adding the filling?
Yes, let them cool for 2 minutes. This brief resting period allows the rice to set so the cups maintain their shape when spooned.
Crispy Sushi Cups