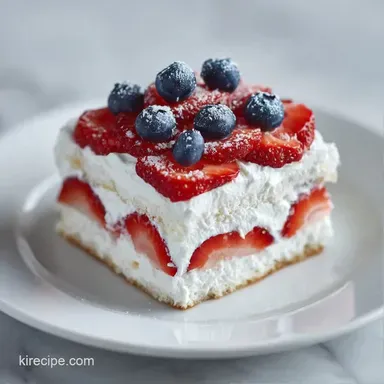
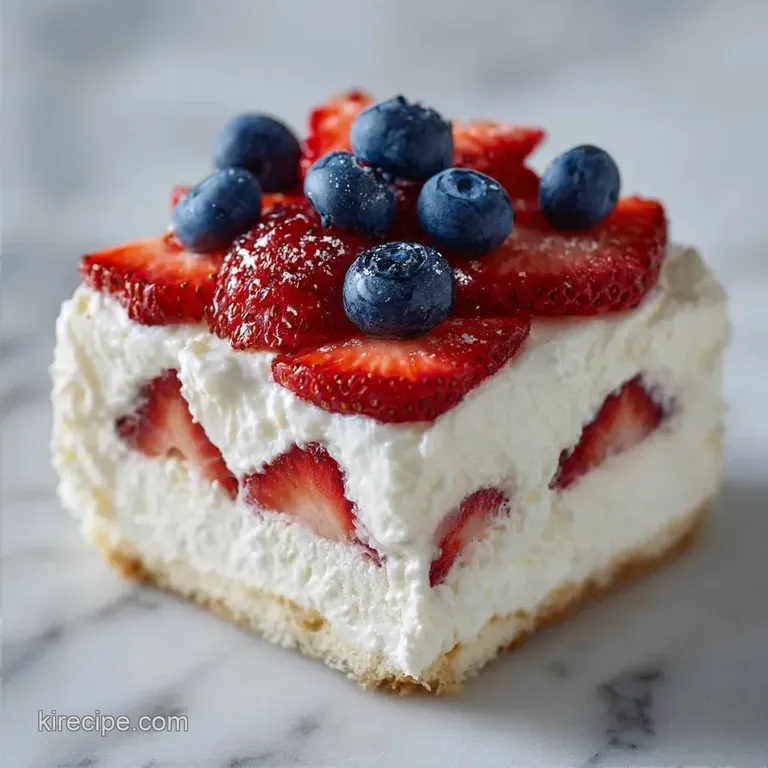
Old Fashioned Berry Icebox Cake: Silky and Creamy
- Time:20 mins active + 6 hours 20 mins chilling
- Flavor/Texture Hook: Shatter crisp crackers that turn silky and cream filled
- Perfect for: Summer potlucks or a low stress dinner party dessert
Making the Perfect Berry Icebox Cake
Snap. That's the sound of a graham cracker before it meets the cream. Have you ever wondered how a dry, crunchy biscuit can turn into something that feels like a cloud of sponge cake? It feels like a magic trick, but it's actually just a slow soak.
I remember the first time I tried this. I didn't wait long enough, and I ended up with layers of cream and literal crackers that nearly broke my teeth. It was a mess. But once I learned to let it sit, the result was this velvety, layered dream that tastes like a fresh berry cheesecake without the effort of a water bath.
This Berry Icebox Cake is all about patience. You aren't just assembling a dessert, you're starting a chemical reaction. By the time you slice into it, those crackers have absorbed enough moisture to become tender, while the berries release just enough juice to streak the cream with color.
Why Most Recipes Fail
Most people treat this like a trifle, where you just throw things in a bowl and serve. That's a mistake. If you don't use a stabilized cream, your cake will slump the second you cut a slice. A plain whipped cream is too weak to hold up the weight of a pound of strawberries and layers of crackers.
Another common slip up is the berry prep. If the berries are too chunky, you can't get a clean slice, and the cake slides apart. You want thin, consistent slices. This ensures the structural integrity of the layers.
Finally, the "chill rush" is real. People try to serve this after two hours. At that point, the center is still crunchy. You need that full 6 hours for the moisture to migrate from the cream into the starch of the crackers.
What Actually Makes It Cakey
- Starch Hydration: The crackers act as sponges, pulling water from the cream into their structure, which softens the gluten-free starch.
- Fat Stabilization: The cream cheese provides a structural scaffold, preventing the whipped cream from collapsing under the berry weight.
- Cold Setting: Low temperatures slow down the breakdown of the cream, allowing the layers to bond into a single, sliceable unit.
- Moisture Migration: Water moves from high concentration areas (the cream) to low concentration areas (the dry crackers) over several hours.
| Method | Chill Time | Texture | Best For |
|---|---|---|---|
| Icebox (No Bake) | 6+ hours | Silky, soft crumb | Summer heat, easy prep |
| Baked Cake | 1 hour | Spongy, structured | Formal events, winter |
| Frozen Parfait | 2 hours | Icy, dense | Individual servings |
The Building Blocks
Component Analysis
| Ingredient | Science Role | Pro Secret |
|---|---|---|
| Cream Cheese | Structural Binder | Use full fat; low-fat breaks the emulsion |
| Heavy Cream | Aeration/Volume | Must be 40°F or colder for maximum lift |
| Graham Crackers | Starch Base | Honey variety adds a subtle floral note |
| Fresh Berries | Acidity/Moisture | Pat dry after washing to avoid "weeping" |
Essential Kitchen Tools
You don't need a professional lab, but a few specific tools make this foolproof. A 9x9 inch square baking dish is the standard here. If you use a larger pan, your layers will be too thin and the cake will feel more like a tart than a cake.
An offset spatula is your best friend for the cream layers. It allows you to push the filling into the corners without disturbing the crackers underneath. If you don't have one, a flat butter knife works, but it takes a bit more patience to get that smooth finish.
Finally,, a hand mixer or a stand mixer such as KitchenAid is necessary. You can't whisk this by hand without losing your mind. You need those stiff peaks to ensure the Berry Icebox Cake doesn't turn into a berry soup in your fridge.
Putting Everything Together
Phase 1: Whipping the Filling 1. Beat the softened cream cheese and powdered sugar. Whip for 2-3 mins until the mixture is completely smooth and devoid of lumps. Note: Cold cream cheese will stay lumpy. 2. Slowly pour in the heavy cream and vanilla.
Increase speed to medium high and whip until stiff peaks form. Note: Stiff peaks mean the cream stands straight up when you lift the beaters.
Phase 2: Building the Foundation 3. Lay a single layer of graham crackers at the bottom of a 9x9 inch square baking dish. Break the edges to fit the corners snugly. 4. Spread approximately 1 cup of the cream mixture over the crackers.
Use an offset spatula to reach every corner.
Phase 3: The Berry Integration 5. Place a dense layer of sliced strawberries over the cream. Ensure they overlap slightly to prevent gaps. 6. Continue layering crackers, cream, and blueberries or raspberries. Repeat the process 2-3 times. 7.
Finish with a final layer of cream and a decorative topping of mixed berries.
Phase 4: The Cold Set 8. Refrigerate for a minimum of 6 hours. Do not touch it until the timer goes off to allow the crackers to hydrate into a cake like texture.
Chef's Note: For a more professional look, save a few whole blueberries and raspberries for the very top. Arrange them in a pattern or a concentric circle before the final chill.
Fixing Common Issues

Why Your Cream Is Runny
If your filling doesn't hold its shape, it's usually because the cream wasn't cold enough or you over beated it. Over beating turns cream into butter, which ruins the texture. According to Serious Eats, temperature is everything when whipping fats.
The Crackers Are Still Crunchy
This happens when you skip the wait time. The moisture takes hours to penetrate the center of the cracker. There is no shortcut here; the fridge is the oven for this recipe.
Berry Bleed Issues
When berries sit in cream, they can leak juice, creating purple streaks. To prevent this, make sure your berries are completely dry before layering.
| Problem | Root Cause | Solution |
|---|---|---|
| Sinking Layers | Cream not whipped to stiff peaks | Re whip with a bit more cold cream |
| Soggy Bottom | Too much cream in the first layer | Use exactly 1 cup per layer |
| Bland Flavor | Room temp vanilla or old berries | Use pure extract and peak season fruit |
Common Mistakes Checklist
- ✓ Did you soften the cream cheese to 65-70°F?
- ✓ Are the berries patted dry with a paper towel?
- ✓ Did you check for stiff peaks before stopping the mixer?
- ✓ Is the dish covered to prevent the cream from absorbing fridge odors?
- ✓ Did you wait the full 360 minutes (6 hours) before slicing?
Creative Flavor Swaps
If you want to change the vibe, you can easily tweak the ingredients. For a richer, more dessert style flavor, you can add a teaspoon of lemon zest to the cream mixture. This cuts through the fat of the cream cheese and makes the berries pop.
For those avoiding gluten, use gluten-free graham crackers. The texture remains almost identical because the hydration process works on most starches. If you're craving something different, you might like these mini cheesecakes which use a similar flavor profile.
Decision Shortcut
- If you want more tang → Add 1 tbsp lemon juice to the cream.
- If you want a firmer slice → Increase cream cheese by 2 oz.
- If you want a lighter feel → Replace half the cream with whipped topping.
| Original Ingredient | Substitute | Why It Works |
|---|---|---|
| Graham Crackers | Ladyfingers | More porous; creates a more "sponge cake" feel |
| Strawberries | Mango slices | Same structure; adds a tropical sweetness |
| Powdered Sugar | Maple Syrup | Adds depth; Note: May make cream slightly softer |
Scaling Guidelines
Scaling Down (½ Batch) Use a 5x9 inch loaf pan instead of the square dish. Reduce the chilling time by about 20%, though 5 hours is still the safest bet. If the recipe calls for a partial egg (not in this version, but for others), beat it in a bowl first and measure by weight.
Scaling Up (2x Batch) Do not simply double the salt or extracts; increase them to 1.5x to avoid overpowering the fruit. Work in batches when whipping the cream, as most home mixers can't handle 4 cups of heavy cream without splashing.
Use two 9x9 dishes rather than one giant pan to ensure the layers stay distinct.
Debunking Icebox Myths
Myth: You can use frozen berries to save money. Truth: Frozen berries release significantly more water as they thaw. This will turn your Berry Icebox Cake into a soggy mess. Always use fresh, firm fruit for the layers.
Myth: Adding gelatin is necessary for stability. Truth: The cream cheese acts as a natural stabilizer. As long as you whip the cream to stiff peaks and chill it long enough, you don't need gelatin to get a clean slice.
Storage and Waste
Store this cake in the refrigerator, tightly covered with plastic wrap or a lid. It stays fresh for 3-4 days. Do not freeze it, as the cream will separate and the crackers will lose their specific "cakey" texture upon thawing.
To avoid waste, use any leftover berry scraps to make a quick coulis. Simmer the bruised berries with a splash of water and a pinch of sugar for 10 minutes, then strain. This sauce is a great topper for the cake when you serve it.
Tasty Pairing Ideas
Since this is a rich, creamy dessert, you need something to balance the sweetness. A tart, sparkling beverage works best. My favorite pairing is a chilled Peach Sangria, as the acidity of the wine and the fruitiness of the peach complement the cream cheese.
If you're serving this at a brunch, pair it with something salty, like a sharp cheddar platter or some smoked salmon. The contrast between the sweet Berry Icebox Cake and the savory appetizers keeps the palate refreshed. For another berry themed treat, you could serve this alongside some light blueberry scones.
Recipe FAQs
Is a berry icebox cake a good option for an easy dessert?
Yes, it is an excellent choice. It requires zero baking and uses simple layering techniques to create a professional result with minimal effort.
How to make a berry icebox cake?
Beat softened cream cheese and powdered sugar until smooth. Whip in heavy cream and vanilla to stiff peaks, then layer the mixture with graham crackers and fresh berries in a 9x9 inch dish.
How long does this cake need to set in the fridge?
Refrigerate for at least 6 hours or overnight. This time is essential to allow the graham crackers to hydrate and soften into a cake like texture.
Is it true that the graham crackers will stay crunchy in an icebox cake?
No, this is a common misconception. The moisture from the cream and berries specifically transforms the crackers into a soft, sponge like consistency.
Can I use different filling layers for a different flavor profile?
Yes, you can vary the fillings. If you enjoyed the layering technique here, see how the same principle works in our peanut butter mousse cake for a richer taste.
Can I freeze berry icebox cake for later?
No, do not freeze it. Freezing causes the cream to separate and ruins the specific "cakey" texture of the hydrated crackers upon thawing.
What should I do if my cream mixture doesn't form stiff peaks?
Ensure your heavy cream is well chilled. If the cream is too warm, it cannot hold air; try chilling your mixing bowl and continuing to beat on medium high speed.
Berry Icebox Cake