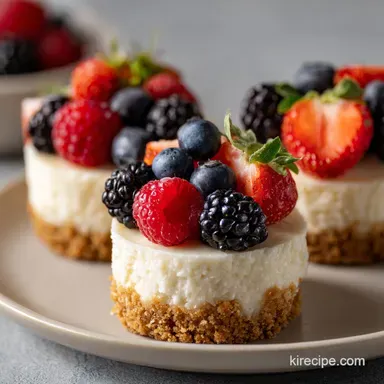
Cute Mini Cheesecakes: Perfectly Creamy and Berry Topped
- Time:20 minutes active + 1 hour 30 mins chilling = Total 1 hour 50 mins
- Flavor/Texture Hook: Tangy, velvety filling with a shatter crisp graham crust
- Perfect for: Baby showers, tea parties, or a high end treat for two
- Cute Mini Cheesecakes with Fresh Berries
- The Secret to Velvety Texture
- Quick Recipe Specs
- Understanding the Ingredients
- The Essential Tool Kit
- Ingredients & Substitutes
- Step-by-Step Baking Guide
- Fixing Common Baking Errors
- Troubleshooting Common Issues
- Adjusting Your Batch Size
- Dessert Truths
- Storing Your Treats
- Pro Plating Tips
- Recipe FAQs
- 📝 Recipe Card
Cute Mini Cheesecakes with Fresh Berries
I remember the first time I tried making these for a baby shower. I was in a rush, so I pulled the cream cheese straight from the fridge and figured my mixer could handle it. I ended up with these tiny, stubborn lumps that looked like cottage cheese throughout the filling.
I spent twenty minutes trying to whisk them out, but once they're in there, they're in there.
Now, I leave the block on the counter for at least four hours; it's the only way to get that velvety, cloud like texture. The real hero here is the cream cheese. It provides the structure and the signature tang, but if it's too cold, it won't bond with the sugar and eggs, leaving you with a grainy mess.
Trust me on this, the patience you spend waiting for the ingredients to warm up is what separates a home bake from something that tastes like a professional bakery. These Cute Mini Cheesecakes with Fresh Berries are all about precision and temperature, but once you nail those, they're practically foolproof.
The Secret to Velvety Texture
- Air Control
- Beating the eggs too fast traps air, which causes the cakes to rise and then collapse.
- Fat Binding
- Softened cream cheese blends with sugar to create a smooth base without lumps.
- Acid Balance
- Sour cream adds a slight tang and prevents the filling from becoming too dense.
- Temperature Stability
- A low oven temp prevents the edges from overcooking before the center sets.
| Feature | Fresh Berries | Jam/Preserves |
|---|---|---|
| Texture | Burst of juice | Sticky and thick |
| Flavor | Bright and tart | Very sweet |
| Appearance | Natural and vibrant | Glossy and uniform |
| Best For | Fresh parties | Long term storage |
Quick Recipe Specs
- - Cream Cheese Temp
- Must be between 65-70°F (18-21°C) to avoid lumps.
- - Filling Volume
- Fill each liner 3/4 full (roughly 2-3 tbsp) to prevent overflowing.
- - The Jiggle Test
- The center should move slightly like gelatin, not slosh like liquid, before pulling them out.
Understanding the Ingredients
| Ingredient | Science Role | Pro Secret |
|---|---|---|
| Cream Cheese | Structural Base | Use full fat blocks, not the spreadable tub version |
| Sour Cream | Moisture Agent | Adds a velvety mouthfeel and prevents cracking |
| Eggs | Binding Protein | Add one at a time to ensure a stable emulsion |
| Graham Crumbs | Textural Contrast | Toast them slightly for a deeper, nuttier flavor |
The Essential Tool Kit
You don't need a professional kitchen for this, but a few things make it way easier. A standard 12 slot muffin tin is the go to here. I highly recommend using paper liners; trying to peel a cheesecake off the metal is a nightmare you don't want.
An electric hand mixer or a stand mixer such as KitchenAid is essential. You can't really beat cream cheese into a smooth paste by hand without spending an hour at it. Also, have a wire rack ready for cooling so the bottoms don't get soggy from trapped steam.
Ingredients & Substitutes
For the Crust
- 1.5 cups (150g) graham cracker crumbs Why this? Provides a classic, honey wheat base (Sub: Almond flour for a gluten-free, nuttier crust)
- 0.5 cup (100g) unsalted butter, melted Why this? Binds crumbs into a crisp shell (Sub: Coconut oil for a dairy-free option)
- 0.25 cup (50g) granulated sugar Why this? Adds sweetness and helps the crust brown (Sub: Brown sugar for a caramel note)
For the Filling
- 16 oz (450g) cream cheese, softened Why this? The core for thickness and tang (Sub: Neufchâtel for a slightly lighter taste)
- 0.5 cup (100g) granulated sugar Why this? Balances the tartness of the cheese (Sub: Powdered sugar for a smoother texture)
- 2 large eggs Why this? Sets the filling as it bakes (Sub: 1/2 cup applesauce for a denser, eggless version)
- 1 tsp (5ml) vanilla extract Why this? Adds aromatic warmth (Sub: Almond extract for a cherry like scent)
- 1 cup (240ml) sour cream Why this? Ensures a velvety, creamy finish (Sub: Greek yogurt for more protein)
For the Topping - 2 cups (250g) mixed fresh berries Why this? Fresh acid cuts through the rich cheese (Sub: Frozen berries, thawed and drained) - 2 tbsp (30ml) honey Why this? Natural glaze for a glossy look (Sub: Maple syrup for a woody
Sweetness)
Step-by-step Baking Guide

1. Preparing the Crust
Preheat your oven to 325°F (163°C). In a medium bowl, mix together the graham cracker crumbs, melted butter, and sugar until well combined. Press the mixture evenly into the bottom of each muffin liner in a muffin tin.
Bake the crusts for 8 minutes until lightly golden and smelling toasted, then set aside to cool slightly.
2. Making the Filling
In a large bowl, beat the softened cream cheese until smooth using an electric mixer. Gradually add in the sugar, continuing to beat until combined.
Chef Note: Stop as soon as the sugar is incorporated. Over beating at this stage pushes too much air into the batter, which is a primary cause of surface cracks.
3. Incorporating the Binders
Add the eggs, one at a time, mixing on low speed and mixing well after each addition. Stir in the vanilla extract and sour cream until smooth. According to King Arthur Baking, ensuring ingredients are at room temperature helps the fats and proteins bond more effectively.
4. Baking the Cakes
Pour the cheesecake filling into each crust, filling them about 3/4 full. Bake in the preheated oven for 15-18 minutes, until the edges are set but the centers have a slight jiggle.
5. Cooling and Finishing
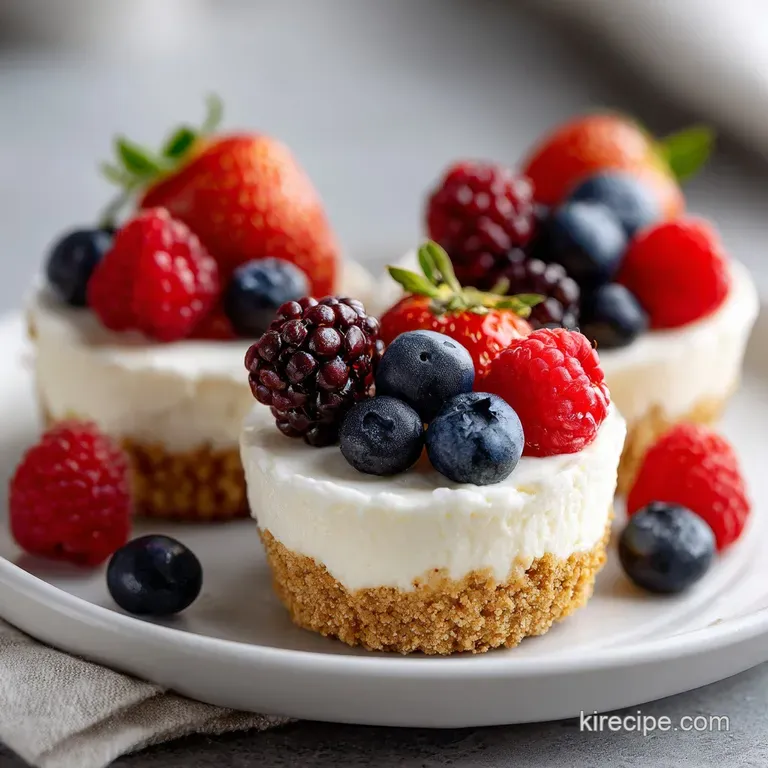
Remove from oven and allow to cool to room temperature on a wire rack. Refrigerate for at least 1.5 hours. Once completely chilled, top each cheesecake with a mix of fresh berries. Drizzle honey over the berries and garnish with mint leaves if desired.
Fixing Common Baking Errors
Troubleshooting Common Issues
| Issue | Solution |
|---|---|
| Why Your Cheesecake Cracked | This usually happens because of overmixing the eggs or baking at too high a temperature. When you beat too much air into the batter, the cakes puff up like soufflés and then sink, creating a split on |
| Why the Crust Is Soggy | Sogginess occurs if the crust isn't pre baked or if the filling is added while the crust is still piping hot. Pre baking creates a moisture barrier. If you're feeling extra cautious, you can brush the |
| Why the Filling Is Grainy | This is almost always due to cold cream cheese. If the cheese isn't fully softened, it won't emulsify with the sugar. If you find lumps, don't keep beating them you'll just add air. Instead, briefly w |
Common Mistakes Checklist
- ✓ Did I leave the cream cheese out for 4 hours?
- ✓ Did I pre bake the crusts?
- ✓ Did I add eggs one by one on low speed?
- ✓ Did I stop baking while the center still jiggles?
- ✓ Did I chill them for at least 90 minutes?
Adjusting Your Batch Size
If you're just making a few for yourself, you can halve this recipe. Use a smaller tin or just fill 6 slots. Reduce the baking time by about 20% (around 12-14 minutes) since the oven won't be as crowded, but still rely on the "jiggle test." For eggs, beat one egg in a bowl and use half of it.
When doubling the recipe for a big crowd, work in batches. Don't try to cram 24 cheesecakes into one oven if it blocks the airflow. If you're baking a double batch, lower the oven temp to 300°F (150°C) and extend the time by 5-10 minutes to ensure an even cook without burning the edges.
| If you want... | Do this... |
|---|---|
| A lighter texture | Fold in 1/2 cup whipped cream |
| A crunchier base | Add 1 tbsp melted butter to crumbs |
| A tarter finish | Replace honey with a lemon glaze |
Dessert Truths
Myth: You must use a water bath for mini cheesecakes. Truth: While a water bath is great for large cakes, it's overkill for minis. Their small size allows them to cook through quickly enough that a low oven temp (325°F) is sufficient to prevent cracking.
Myth: low-fat cream cheese works just as well. Truth: low-fat versions have higher water content and different protein structures. This leads to a grainier texture and a higher chance of the cake collapsing. Stick to full fat for that velvety feel.
Storing Your Treats
Store these in an airtight container in the fridge for up to 5 days. Keep the berries separate until you're ready to serve, as the moisture from the fruit can make the cheesecake top soft over time.
For longer storage, you can freeze the cheesecakes without the berries. Wrap them individually in plastic wrap and place them in a freezer bag for up to 2 months. To reheat, let them thaw in the fridge overnight. If you're feeling savory before the dessert, my Chicken Noodle Soup is the ultimate comfort start to a meal.
Zero Waste Tip: Don't throw away the leftover berry stems or the bits of graham cracker crumbs at the bottom of the bag. Toss the crumbs into your morning oatmeal for extra crunch, and simmer the berry stems with a bit of sugar and water to make a quick syrup for pancakes.
Pro Plating Tips
To make these Cute Mini Cheesecakes with Fresh Berries look like they came from a boutique bakery, focus on height. Instead of just laying the berries on top, stack three blueberries and one raspberry in a small pyramid.
Use a honey dipper to create a thin, elegant spiral of honey over the fruit rather than just pouring it on. A single, tiny mint leaf tucked into the side adds a pop of green that makes the red and blue berries stand out.
If you're serving these on a platter, scatter a few extra fresh berries and a dusting of powdered sugar around the base for a professional finish.
Recipe FAQs
How do I store these mini cheesecakes?
Place them in an airtight container in the fridge for up to 5 days. Keep the berries separate until serving to prevent the moisture from the fruit from softening the cheesecake tops.
Why did my mini cheesecakes crack on top?
This usually happens because of overmixing the eggs or baking at too high a temperature. Too much air in the batter causes the cakes to puff up and then sink, creating a split.
How to prevent the crust from becoming soggy?
Bake the crusts for 8 minutes at 325°F before adding the filling. Pre-baking creates a moisture barrier that keeps the base crisp.
Is it true that I must bake the berries into the cheesecake filling?
No, this is a common misconception. Top the cheesecakes with fresh berries and honey only after they have been completely chilled in the refrigerator.
How to avoid a grainy texture in the filling?
Beat the softened cream cheese until completely smooth using an electric mixer. Ensure the cream cheese is fully softened before starting to prevent lumps from forming.
Can I freeze these treats for later?
Yes, but store them without the berries. Wrap the cheesecakes individually in plastic wrap and place them in a freezer bag for up to 2 months.
How long should the cheesecakes chill before adding toppings?
Refrigerate for at least 1.5 hours. This ensures the centers are fully set and firm enough to support the fresh berries and honey drizzle.
Cute Mini Cheesecakes