Lean & Easy Sheet Pan Cheeseburger Sliders
- Time:10 minutes prep + 20 minutes cook = Total 30 minutes
- Flavor/Texture Hook: Buttery, toasted buns with a silky melted cheese center
- Perfect for: Game day appetizers, quick weeknight dinners, or budget-friendly parties
- The Secret to a Crowd-Pleasing cheeseburger sliders recipe
- Essential Timing and Yield Details
- Selecting the Best Flavor Components
- The Right Tools for the Job
- Steps for a Golden Brown Finish
- Fixing the Most Common Slider Slumps
- Creative Twists for More Flavor
- Freshness and Waste Management
- Plating for Maximum Impact
- Recipe FAQs
- 📝 Recipe Card
The Secret to a Crowd Pleasing cheeseburger sliders recipe
That first sizzle of ground beef hitting a hot skillet is where the magic starts. I remember the first time I tried making these for a game day party a few years back. I took a shortcut and layered raw beef patties directly onto the rolls, thinking the oven would handle the cooking.
The result was a total disaster, a grey, steamed mess where the bottom buns had turned into wet sponges. I almost threw the entire tray away in frustration.
I spent the next few weekends messing around with the order of operations. I realized that if you brown the meat completely and drain the grease before it ever touches the bread, you save the texture of the rolls.
Then I added a Worcestershire infused butter glaze to the tops, which creates a protective seal and a toasted, salty crust. Now, these are the only sliders I make because they actually hold their shape and taste like a real burger, not a steamed sandwich.
You can expect a result that feels indulgent but doesn't break the bank. By using lean beef and reduced fat cheese, we keep the grease levels down so the sliders don't slide apart when you pick them up. It's a fuss free approach that gives you that classic American diner taste with a fraction of the effort.
Essential Timing and Yield Details
Before we get into the meat of things, let's look at the logistics. This recipe is designed for speed, making it a go to for those hectic Tuesday nights or sudden guests. We're focusing on a 30 minute total turnaround, which is practically a miracle for a meal that feels this substantial.
| Method | Total Time | Bun Texture | Best For |
|---|---|---|---|
| Sheet Pan (This Recipe) | 30 minutes | Toasted & Soft | Feeding 12 people fast |
| Individual Searing | 45 minutes | Charred & Firm | Custom doneness per burger |
When you're timing this out, remember that the 10 minutes of prep is mostly just chopping the onion and slicing the rolls. The actual active cooking is the browning of the beef.
Once the sliders are assembled and in the oven, you have about 10 minutes to clean up your skillet before the timer goes off.
For a group of 12, one pack of Hawaiian rolls is exactly what you need. If you're feeding a larger crowd, I recommend working in batches of 12 rather than trying to cram 24 sliders into one massive pan, as the center often stays cold while the edges burn.
Selecting the Best Flavor Components
The key to a budget smart recipe is choosing ingredients that punch above their weight class. Lean ground beef is a smart choice here, not just for health, but because it prevents the rolls from absorbing too much fat and becoming mushy.
The Logic Behind Sheet Pan Baking: By baking everything together, the cheese acts as a glue that binds the beef to the bun, while the heat distributes evenly across the surface. This creates a uniform melt that you just can't get with individual burgers.
- The Butter Barrier: Melting butter and brushing it on top creates a fat seal that prevents the buns from drying out while they toast.
- Umami Layering: Combining onion soup mix and Worcestershire sauce creates a deep, savory base that mimics a burger that's been grilling for an hour.
- Moisture Control: Draining the beef after browning removes excess water, ensuring the bread stays structural.
| Servings | Beef Amount | Pan Size | Cook Time |
|---|---|---|---|
| 6 people | 0.5 lb beef | 9x5 loaf pan | 12-15 minutes |
| 12 people | 1 lb beef | 9x13 inch pan | 10-12 minutes |
| 24 people | 2 lb beef | Two 9x13 pans | 10-12 minutes |
Component Analysis
| Ingredient | Science Role | Pro Secret |
|---|---|---|
| Lean Beef (90%) | Main structure and protein | Prevents "grease pooling" in the pan |
| Onion Soup Mix | Concentrated flavor/salt | Adds a subtle sweetness and depth |
| Hawaiian Rolls | Sweet, airy carrier | The sugar in the bread carmelizes quickly |
| Worcestershire | Acidic balance | Cuts through the richness of the cheese |
The Right Tools for the Job
You don't need a professional kitchen to pull this off. A standard 9x13 inch baking dish is the MVP here. If you don't have one, a rimmed sheet pan works, but you'll have to huddle the rolls closer together to keep the cheese from leaking out the sides.
For the meat, a large skillet is essential. I prefer a cast iron skillet (like Lodge) because it holds heat better, ensuring the beef browns and sizzles rather than steaming in its own juices. You'll also need a pastry brush for the glaze, though the back of a spoon works in a pinch.
Right then, make sure you have a sharp serrated knife for the rolls. Trying to slice through a whole pack of Hawaiian rolls with a chef's knife usually results in squashed buns. A bread knife lets you glide through the middle in one clean motion.
Steps for a Golden Brown Finish
Let's get into the actual process. Trust me on the browning step, it's the difference between a gourmet slider and a soggy mess.
- Heat 1 tbsp olive oil in a skillet over medium high heat. Note: Wait until the oil shimmers to avoid sticking.
- Add 1 lb lean ground beef to the skillet and cook until browned and fragrant.
- Stir in 1 tbsp onion soup mix, 1/2 tsp garlic powder, and 1/4 tsp black pepper. Drain any residual liquid from the meat. Note: This step is critical for bun integrity.
- Slice the entire pack of Hawaiian rolls in half horizontally.
- Place the bottom half of the rolls into a 9x13 inch baking dish.
- Layer the cooked beef evenly across the bottom rolls, then top with 2 tbsp thinly sliced red onions and 6 slices reduced fat cheddar cheese.
- Place the top half of the rolls over the cheese layer.
- Whisk together 2 tbsp melted butter, 1/2 tsp garlic powder, and 1 tsp Worcestershire sauce.
- Brush the glaze generously over the tops of the buns.
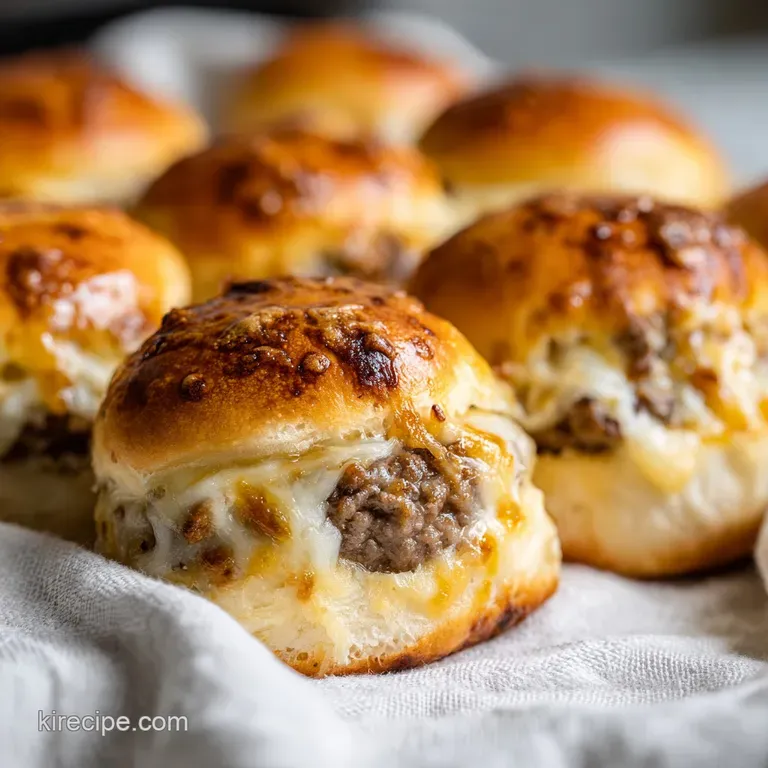
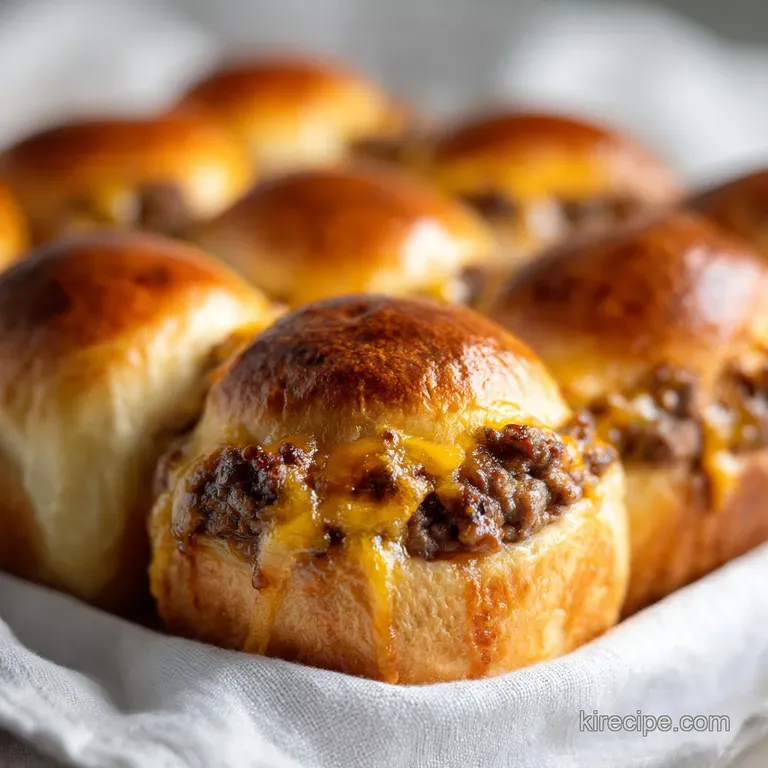
- Bake at 350°F (175°C) for 10-12 minutes until the cheese is melted and the tops are mahogany colored.
Once they come out, let them sit for 2 minutes. This allows the cheese to set slightly so the fillings don't slide out when you pull the sliders apart. Add your 12 slices of dill pickle chips to each slider right before serving for that fresh, vinegary snap.
Fixing the Most Common Slider Slumps
Even with a solid plan, things can go sideways. Most issues come down to moisture management or temperature. If your buns feel damp, it's usually because the beef wasn't drained properly or the oven wasn't preheated.
Why Your Buns Feel Soggy
This usually happens when there's too much liquid in the meat mixture or the beef was added raw. By browning the meat first and draining the fat, you create a barrier. Ensure your oven is fully at 350°F before the pan goes in.
Why the Cheese Isn't Melting
If the beef is too cold when it goes into the pan, the cheese has to work overtime to heat up. Make sure your beef is still warm from the skillet when you assemble the sliders.
| Problem | Root Cause | Solution |
|---|---|---|
| Soggy Bottoms | Excess beef grease | Drain beef thoroughly in a colander |
| Burnt Tops | Oven rack too high | Move pan to middle rack |
| Dry Buns | Overbaked | Remove exactly at 12 minutes |
Preventative Checklist:
- ✓ Pat the red onions dry after slicing to prevent extra moisture
- ✓ Preheat the oven for at least 15 minutes
- ✓ Use a serrated knife for the rolls to avoid crushing them
- ✓ Drain the beef in a separate bowl before layering
- ✓ Apply glaze to the very edges of the buns for even browning
Creative Twists for More Flavor
While the classic version is great, you can easily pivot this recipe to suit your mood. If you want a dipping sauce, a smashburger sauce is a killer addition that adds a tangy, creamy element to the meal.
For those who like a bit of heat, try adding a pinch of cayenne pepper to the beef or swapping the cheddar for Pepper Jack. If you're looking for a BBQ vibe, replace the Worcestershire sauce in the glaze with a teaspoon of your favorite smoky BBQ sauce.
Quick Choice Guide: If you want it spicy, use Pepper Jack cheese and sliced jalapeños. If you want it smoky, swap the butter glaze for a honey BBQ mix. If you want it lighter, use ground turkey and a slice of provolone.
| Original Ingredient | Substitute | Why It Works |
|---|---|---|
| Lean Beef (1 lb) | Ground Turkey (1 lb) | Similar texture. Note: Leaner flavor; add 1 tsp extra Worcestershire |
| Sharp Cheddar | Swiss or Provolone | Great meltability. Note: Milder taste than cheddar |
| Hawaiian Rolls | Brioche Sliders | Buttery and rich. Note: Less sweet than Hawaiian rolls |
Freshness and Waste Management
These sliders are best served hot, but leftovers are inevitable. Store any remaining sliders in an airtight container in the fridge for up to 3 days. To reheat, avoid the microwave if you can, as it makes the buns rubbery.
Instead, pop them in a 300°F (150°C) oven for 5-8 minutes until the cheese is silky again.
Freezing is a bit trickier because of the pickles and onions. I recommend freezing the sliders before adding the pickle chips. Wrap them tightly in foil and store them in a freezer bag for up to 2 months. Thaw in the fridge overnight before reheating in the oven.
To keep things zero waste, don't toss those leftover red onion scraps. Finely dice them and toss them into a salad or sauté them with some butter to use as a topping for tomorrow's breakfast eggs. If you have a bit of butter glaze left in the bowl, brush it on a piece of toast for a quick savory snack.
Plating for Maximum Impact
Presentation is everything, even for a casual party. Instead of serving them straight from the baking dish, use a spatula to lift the entire block of sliders onto a wooden cutting board. Slice through the rolls with the serrated knife to create individual sliders, then gently pull them apart.
These sliders are a heavy hit, so pair them with something crunchy and acidic to balance the richness. They go incredibly well with a side of my Cowboy Cabbage Salad, which provides a fresh contrast to the buttery buns and savory beef.
For the final touch, lean the dill pickle chips against the side of each slider or spear them with a toothpick. This not only looks professional but keeps the buns from getting too moist from the pickle brine.
A small bowl of extra melted cheese or a side of spicy mayo on the platter makes the whole spread look like it came from a high end gastropub.
Recipe FAQs
What do you put on a slider burger?
Beef, cheese, and pickles. This recipe uses lean ground beef seasoned with onion soup mix, topped with red onion, reduced fat sharp cheddar, and dill pickle chips on Hawaiian rolls.
What kind of cheese do you use for Cheeseburger Sliders?
Reduced fat sharp cheddar. This variety provides a strong, tangy flavor profile that stands up well to the seasoned beef.
Are sliders just mini burgers?
Yes, they are essentially miniature burgers. However, they are typically prepared and baked as a connected group in Hawaiian rolls for faster preparation and serving.
What cheese makes the best cheeseburger?
Reduced fat sharp cheddar. It offers the ideal balance of meltability and sharp taste to complement the Worcestershire glaze.
How to prevent the buns from becoming soggy?
Drain any residual liquid from the beef after browning it in the skillet. This prevents the bottom rolls from absorbing excess grease and moisture.
How to get the buns a mahogany colored finish?
Brush the tops generously with a glaze of melted butter, garlic powder, and Worcestershire sauce. Bake them at 350°F for 10-12 minutes.
Is it true that I should bake sliders at 400°F to speed up the process?
No, this is a common misconception. A temperature of 350°F ensures the cheese melts thoroughly without scorching the buns. These pair perfectly with creamy ranch dressing on the side.
Cheeseburger Sliders Recipe

