9X13 Marble Cake: Silky and Velvety
- Time: 25 min active + 35 min bake = 60 min total
- Flavor/Texture Hook: Velvety vanilla and deep cocoa swirls with a silky buttercream topper
- Perfect for: Potlucks, family Sunday dinners, or a foolproof dessert for beginners
The smell of warm vanilla and deep cocoa filling the kitchen is something that just hits different. I remember the first time I tried to make a marbled dessert, I was far too aggressive with the knife, swirling the batters until they were just one muddy, brown mess.
It wasn't a marble effect; it was a chocolate vanilla blur. I realized then that baking isn't just about following a list of steps, it's about the gentle physics of how different batters interact.
Since then, I've focused on the precision of the mix. This 9x13 marble cake relies on a specific balance of moisture and fat to ensure the chocolate and vanilla sections don't just merge or, worse, sink to the bottom of the pan.
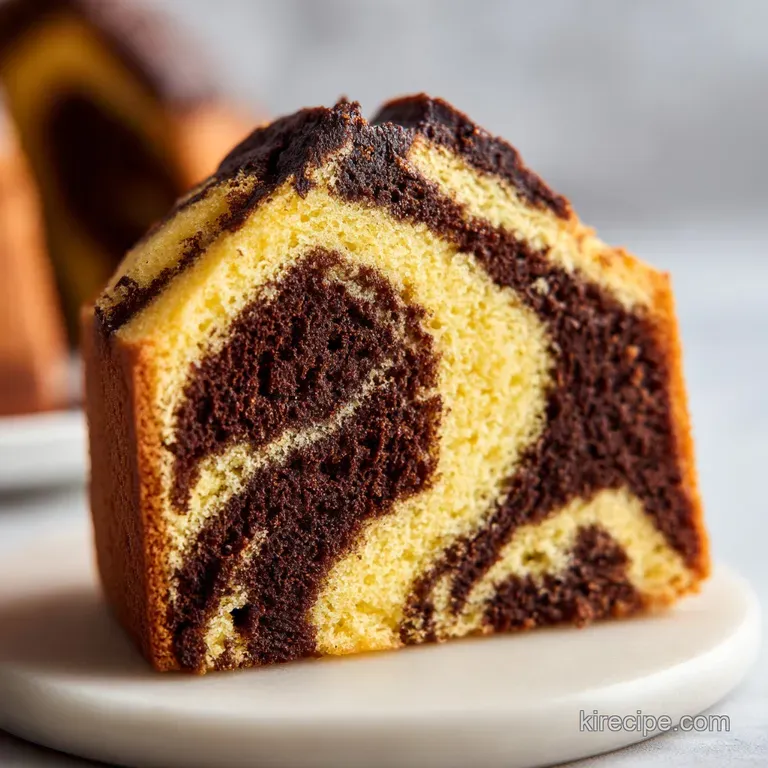
You want those distinct, beautiful ribbons of color that look like a piece of art when you slice into it.
When you make this, you can expect a cake that is moist but sturdy enough to hold a thick layer of buttercream. We aren't going for a light as-air sponge here; we're going for a comforting, dense yet-tender crumb that feels like a hug in cake form.
Trust me, once you see those swirls, you'll never go back to plain vanilla.
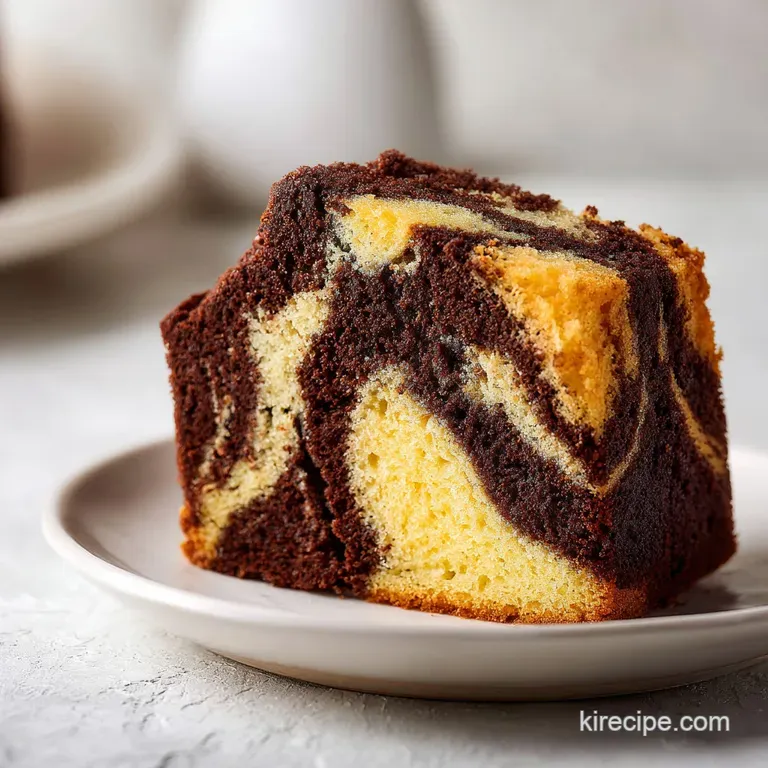
The Best 9x13 Marble Cake
Hidden Secrets of Texture
Right then, let's talk about the real magic happening in the bowl. Most people think a marble cake is just two flavors mixed together, but if you don't get the density right, one flavor will always sink. In this 9x13 marble cake, we use a single base batter and only add the cocoa at the end.
This ensures both the vanilla and chocolate portions have almost identical weights, so they stay suspended in those pretty swirls.
I once made the mistake of using a separate chocolate batter with extra eggs, and the whole thing sank into a chocolatey puddle at the bottom. By using a cocoa water paste, we introduce the chocolate flavor without adding significant extra liquid or weight.
It keeps the structural integrity of the 9x13 marble cake intact.
Another thing I've learned is the importance of "room temperature" ingredients. If your eggs are cold, they'll seize the softened butter, creating tiny lumps of fat. These lumps create tunnels in your cake.
When everything is at the same temperature, the emulsion is smooth, and the resulting crumb is velvety and consistent.
The Secret to the Swirl
Buttermilk Lift: The acid in the buttermilk reacts with the baking powder to create tiny bubbles, making the crumb tender.
The Cocoa Paste: Mixing cocoa with hot water first prevents dry clumps and ensures the chocolate flavor is evenly distributed.
Air Incorporation: Creaming butter and sugar creates a mechanical leavening that supports the cake's height.
Temperature Balance: Room temperature eggs prevent the batter from breaking, leading to a more uniform rise.
| Method | Time | Texture | Best For |
|---|---|---|---|
| Oven Bake | 35 minutes | Even, velvety crumb | Traditional slices |
| Steaming | 60 minutes | Extremely moist, dense | Custard like feel |
| Slow Cooker | 2 hours | Edge crusty, center soft | Low effort prep |
Component Analysis
| Ingredient | Science Role | Pro Secret |
|---|---|---|
| All Purpose Flour | Structure | Measure by weight (375g) to avoid a dry cake |
| Buttermilk | Tenderizer | Adds a slight tang that cuts through the sugar |
| Unsalted Butter | Fat/Moisture | Soften until it yields to a finger press, not melted |
| Cocoa Powder | Flavor/Color | Use Dutch processed for a darker, smoother taste |
Quick Recipe Specifications
When preparing a 9x13 marble cake, precision is your best friend. I always keep a digital scale on my counter because "cups" can be deceptive depending on how you pack the flour. For this recipe, we are looking at a total time of 60 minutes, with 25 minutes of active prep and 35 minutes of baking.
The goal is to hit a specific internal temperature where the starches have gelatinized but the moisture hasn't evaporated. I’ve found that 350°F (175°C) is the sweet spot. Any higher and the edges will dry out before the center is set.
If you're planning this for a party, keep in mind that the cake needs to be completely cool before you frost it. If the cake is even slightly warm, the buttercream will slide right off, and you'll end up with a melted chocolate mess.
Essential Cake Components
For the cake batter, you'll need: - 3 cups (375g) all purpose flour Why this? Provides the necessary structure for the swirls - 2 cups (400g) granulated sugar Why this? Sweetens and helps tenderize the crumb - 1 tbsp (12g) baking powder Why
This? Primary lift for the 9x13 marble cake - 1/2 tsp (3g) salt Why this? Balances the sweetness - 1 cup (225g) unsalted butter, softened Why this? Creates the velvety mouthfeel - 4 large (200g) eggs, room temperature Why
This? Binds everything and adds richness - 1 cup (240ml) buttermilk, room temperature Why this? Reacts with leavening for a soft texture - 2 tsp (10ml) vanilla extract Why this? Classic aromatic base - 1/3 cup (30g) unsweetened cocoa
Powder Why this? Deep chocolate contrast - 2 tbsp (30ml) hot water Why this? Blooms the cocoa for better flavor
Substitution Options:
| Original Ingredient | Substitute | Why It Works |
|---|---|---|
| Buttermilk (1 cup) | Plain Yogurt (1 cup) | Similar acidity. Note: Result is slightly denser |
| All Purpose Flour | Cake Flour | Lower protein. Note: Creates a finer, softer crumb |
| Unsalted Butter | Coconut Oil (solid) | Similar fat content. Note: Adds a subtle coconut hint |
For the chocolate buttercream: - 1 cup (225g) unsalted butter, softened - 3 cups (360g) powdered sugar - 1/2 cup (45g) cocoa powder - 3 tbsp (45ml) heavy cream - 1 tsp (5ml) vanilla extract
Step by step Process
Let's crack on. To make a successful 9x13 marble cake, we'll divide the process into three distinct phases.
Phase 1: Preparing the Base
Preheat your oven to 350°F (175°C) and thoroughly grease a 9x13 inch baking pan. I like to use a bit of butter and a dust of flour to make sure nothing sticks.
Cream the softened butter and granulated sugar together using a mixer. Do this until the mixture is pale and fluffy. This is where you're trapping air, so don't rush it. Beat in the eggs one at a time, making sure each is fully incorporated before adding the next, then stir in the vanilla extract.
Whisk together the flour, baking powder, and salt in a separate bowl. Gradually add the dry ingredients to the butter mixture, alternating with the buttermilk. Start and end with the flour mixture. Note: Alternating prevents the batter from curdling.
Phase 2: The Divide and Conquer
Divide the batter equally between two mixing bowls. This is the moment where the 9x13 marble cake begins to take shape.
In one bowl, whisk the cocoa powder and hot water into a thick paste. Fold this paste into the batter until it's a deep, rich brown. Be gentle here - you don't want to knock out all that air we just spent time beating in.
Phase 3: Creating the Marble Effect
Pour the vanilla batter into the prepared pan and smooth the top. Spoon the chocolate batter in dollops over the vanilla layer.
Use a knife or skewer to drag through the batter in a figure eight motion. Don't over swirl or you'll just get a brown cake. Stop as soon as you see distinct lines. Bake for 35 minutes until a toothpick inserted into the center comes out clean.
Once cooled, prepare the buttercream by creaming the butter, then beating in powdered sugar, cocoa powder, heavy cream, and vanilla extract until smooth. Spread the buttercream evenly over the cooled cake.
Fixing Common Baking Errors
When things go wrong with a 9x13 marble cake, it's usually a matter of temperature or mixing. If your cake feels more like a rubber ball than a dessert, you've likely over mixed the flour. Once flour hits liquid, gluten begins to form. Too much mixing means too much gluten, which equals a rubbery texture.
If the cake sank in the middle, it's often because the oven door was opened too early, letting the heat escape, or the baking powder was expired. You want a steady heat to keep those air bubbles expanded until the structure sets.
Rubbery Cake Texture
This happens when the batter is over worked. Stop mixing the moment you see no more streaks of flour.
| Problem | Root Cause | Solution |
|---|---|---|
| Rubbery Crumb | Over mixing the flour | Mix only until combined |
| Sinking Center | Opening oven too early | Wait until 30 mins have passed |
| Dry Edges | Oven temperature too high | Use an oven thermometer |
Checklist for Success:
- ✓ Butter is softened but not oily
- ✓ Eggs and buttermilk are room temperature
- ✓ Cocoa is bloomed with hot water
- ✓ Figure eight motion used for swirling
- ✓ Toothpick comes out clean at 35 mins
Ingredient Swaps and Ideas
If you want to change things up, you can easily adapt this 9x13 marble cake. For a nuttier flavor, try replacing the vanilla extract with almond extract in the vanilla portion. It creates a lovely cherry like contrast with the chocolate.
If you're looking for something even more decadent, you can add a layer of raspberry jam between the batter and the frosting. Or, for those who love a different kind of chocolate treat, you might enjoy making Scotcheroos Without Corn Syrup alongside this cake for a dessert platter.
Flavor Boosts
- Espresso Powder: Add 1 tsp to the cocoa paste to make the chocolate taste even deeper.
- Citrus Zest: Add orange zest to the vanilla batter for a bright, citrusy marble effect.
Diet Adaptations
- dairy free: Use a high-quality vegan butter and soy milk with a teaspoon of lemon juice (as a buttermilk sub).
- gluten free: Use a 1:1 gluten-free baking flour blend. Note: You may need an extra egg for stability.
Scaling Your Batch
If you need to make a smaller version of this 9x13 marble cake, you can halve the recipe. Use an 8x8 inch square pan and reduce the baking time by about 20%. When halving eggs, beat one egg in a small bowl and use half of the liquid by weight.
For those scaling up to a 2x batch, don't just double the baking powder and salt - increase them to 1.5x to avoid a metallic taste. Work in batches if your mixer is small, as over crowding the bowl prevents proper aeration.
If you're baking two cakes at once, lower the oven temperature by 25°F (to 325°F/160°C) and extend the baking time by 5-10 minutes. This ensures the heat circulates evenly around both pans.
Baking Truths
There's a common belief that you should "cream" butter and sugar for ten minutes to get the best rise. In reality, over creaming can actually cause the cake to collapse in the oven because you've incorporated too much air that the structure can't support.
Three to five minutes is usually plenty for this 9x13 marble cake.
Another myth is that cold eggs are fine as long as you mix longer. This is false. Cold eggs will break the emulsion of the butter, leading to a coarse, uneven crumb. Always let your eggs sit in a bowl of warm water for 5 minutes if you're in a rush.
Storage and Waste Tips
To keep your 9x13 marble cake fresh, cover it tightly with plastic wrap or store it in an airtight container. It will stay moist at room temperature for 2-3 days. In the fridge, it lasts up to 5 days, but I recommend letting a slice sit out for 20 minutes before eating so the butter in the cake and frosting softens.
This cake freezes beautifully. Wrap individual slices in parchment paper and then foil. They'll stay good for up to 3 months. To reheat, just pop a slice in the microwave for 15-20 seconds.
Zero Waste Tips: If you have cake scraps or edges that got a bit too brown, don't toss them! Crumble them up and mix with a bit of frosting to make cake pops. Alternatively, layer the scraps in a glass with whipped cream and fresh berries to create a quick trifle.
Best Flavor Pairings
This 9x13 marble cake is rich, so it pairs best with something that cuts through the sweetness. A sharp, dark roast coffee or a cold glass of almond milk is a classic choice. For a fruit pairing, fresh raspberries or sliced strawberries add a tartness that complements the chocolate.
If you're serving this as part of a larger dessert spread, consider contrasting the texture. Since this cake is velvety and soft, pairing it with something like a TGIS Lava Fudge Cake gives your guests a choice between a structured sheet cake and a gooey, molten experience.
I also love serving this with a dollop of unsweetened whipped cream and a sprig of mint. It makes the whole thing feel a bit more special without requiring extra effort.
Right then, you've got everything you need to nail this 9x13 marble cake. The key is just to stay patient with your temperatures and gentle with your swirls. Once you see those beautiful ribbons of vanilla and chocolate emerge from the oven, you'll realize that the precision was totally worth it.
This recipe is a fantastic way to get a crowd pleasing dessert on the table without needing a fancy layer cake setup. Whether you're making it for a birthday or just a random Tuesday, the balance of flavors is foolproof. Just remember to let it cool completely before frosting, and you're golden.
Honestly, don't even bother with low-fat substitutions here. The fat from the butter and buttermilk is what gives the cake its signature melt in-your mouth quality. When you're going for a classic marble look, embrace the richness.
Enjoy every bite of your homemade 9x13 marble cake. It's the kind of dessert that makes your kitchen smell like a professional bakery and leaves everyone asking for the recipe. Let me know how yours turns out - I'm betting those swirls are going to look brilliant.
Recipe FAQs
Can I substitute the buttermilk with regular milk?
No, buttermilk is essential. Its acidity reacts with the baking powder to create the specific tender crumb and lift required for this cake.
How to create a defined marble pattern?
Spoon chocolate batter in dollops over the vanilla layer. Use a knife or skewer to drag through the batter in a figure eight motion to swirl the colors without overmixing.
How long does the cake stay fresh at room temperature?
Cover tightly for 2-3 days. Use plastic wrap or an airtight container to prevent the cake from drying out.
Why is the center of my cake still wet while the edges are done?
Ensure your oven is preheated to exactly 350°F (175°C). Uneven heating often causes this, so always verify the center with a toothpick before removing the pan.
Is it true that eggs and buttermilk can be cold?
No, this is a common misconception. These ingredients must be room temperature to prevent the creamed butter from curdling, which ensures a smooth batter.
Can I freeze slices of the marble cake?
Yes, wrap individual slices in parchment and foil. They will maintain their quality in the freezer for up to 3 months.
Can I bake this in round pans instead of a 9x13 pan?
Yes, you can use round pans. If you enjoyed mastering the batter consistency here, see how we adapt similar cake textures in our southern cornbread cake.
9x13 Marble Cake

