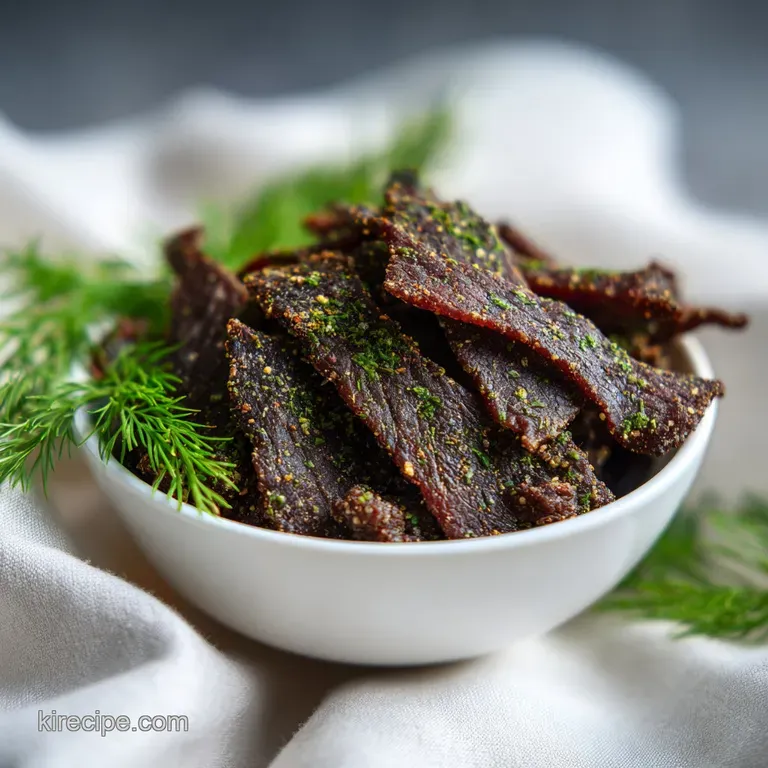
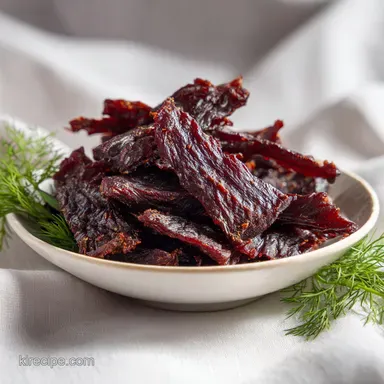
Dill Pickle Jerky: Tender and Zesty
- Time: Active 30 minutes, Passive 6 hours 30 mins, Total 390 minutes
- Flavor/Texture Hook: Tangy, leathery snap with a zesty dill finish
- Perfect for: High protein snacking, road trips, or hiking fuel
- Tangy and Taut: The Ultimate Dill Pickle Jerky Recipe
- Why Your Pickle Jerky Stays Soft and Sallow
- Essential Metrics for Perfect Jerky Results
- Analyzing the Brine and Beef Selection
- Tools for a Smooth Drying Process
- Step-by-Step Drying Guide
- Fixing Texture and Salt Issues
- Flavor Twists and Meat Swaps
- Long-Term Storage and Freshness
- Serving and Gifting Your Jerky
- Recipe FAQs
- 📝 Recipe Card
Tangy and Taut: The Ultimate Dill Pickle Jerky Recipe
Have you ever wondered why that leftover liquid in the pickle jar feels too precious to pour away? It’s not just vinegar and salt; it’s a pre made flavor bomb that happens to be the ultimate meat tenderizer.
Most people don't realize that the lactic acid and vinegar balance in a high-quality brine can transform a lean, tough cut of beef into something that practically melts in a leathery, jerky sort of way on your tongue.
I remember the first time I tried making a homemade dill pickle beef jerky. I thought I could just toss some dried dill on top of regular jerky and call it a day. It was a disaster. The flavor was superficial, and the meat felt like chewing on a rubber band.
That’s when I started experimenting with the actual brine. When you open that dehydrator after six hours and that warm, vinegary, herb heavy aroma hits your face, you’ll know exactly why we don't skip the soak.
This dill pickle jerky recipe isn't just about the flavor; it’s about the satisfying "thwack" of a perfectly dried strip. It’s that specific moment where the beef resists just enough before giving way to a salty, tangy explosion.
Whether you’re a pickle fanatic or just someone looking for a snack that isn't loaded with corn syrup, this process is going to change how you look at your spice cabinet.
Why Your Pickle Jerky Stays Soft and Sallow
The biggest frustration with any pickle jerky recipe dehydrator version is often the texture. If it's too soft, it feels like raw meat; if it's too hard, it shatters like glass. The secret lies in the moisture migration.
Most recipes fail because they don't account for the sugar content in commercial brines or they forget to pat the meat dry before the final seasoning. When you leave excess surface moisture, you're essentially steaming the meat in the dehydrator for the first hour instead of drying it.
Another common pitfall is the cut of meat. If you use something with too much intramuscular fat, like a ribeye (don't do that, please!), the fat will go rancid before the meat even finishes drying. We use eye of round because it’s a solid block of lean muscle. It’s predictable, affordable, and provides that long grain fiber that makes jerky so fun to pull apart. By the way, if you're looking for other ways to use lean beef, my beef bouillon powder recipe is a great way to boost the umami in your kitchen.
Finally, we have to talk about the "pucker factor." A lot of recipes are timid with the vinegar. If you want that authentic dill pickle punch, you need the acidity to penetrate the center of the meat.
This isn't just about surface flavor; it’s about a chemical change in the protein structure that happens during that 12 to 24 hour window.
- Acid Denaturation
- The vinegar and pickle juice begin "cooking" the protein fibers before heat is even applied, shortening the chew.
- Osmotic Exchange
- Salt from the brine travels into the meat cells while drawing out excess water, concentrating the beefy flavor.
- Surface Evaporation
- Patting the meat dry creates a tacky surface (the pellicle) that holds onto the dill weed and mustard powder.
| Meat Thickness | Dehydration Temp | Drying Time | Finished Visual Cue |
|---|---|---|---|
| 3 mm (1/8 inch) | 71°C (160°F) | 5-6 hours | White fibers show when bent |
| 6 mm (1/4 inch) | 71°C (160°F) | 7-8 hours | Cracks but doesn't snap in half |
| Ground Beef (Strips) | 71°C (160°F) | 4-5 hours | Firm and matte with no oily sheen |
Choosing the right thickness is the first decision you'll make. I personally prefer the 1/8 inch (3mm) slice because it maximizes the surface area for that dill heavy seasoning. If you go thicker, you'll get a more substantial "steak like" chew, but you might need to extend your drying time by an hour or two.
Essential Metrics for Perfect Jerky Results
Before we get our hands messy, let's look at what actually goes into the marinade. We aren't just throwing things in a bowl; every component has a job. The pink curing salt, for instance, isn't just for color. It’s a safety measure.
When you're drying meat at low temperatures for six hours, you're in the "danger zone" for bacterial growth. The nitrates in the curing salt keep things safe while giving the jerky that classic reddish pink hue instead of a dull grey.
| Component | Role in Recipe | Pro Secret |
|---|---|---|
| Eye of Round | The Base | Slice against the grain for a tender bite, or with the grain for a "tough" chew. |
| Pickle Juice | Primary Acid | Use the "cloudy" juice from fermented pickles for a more complex, probiotic style tang. |
| Pink Curing Salt #1 | Safety/Color | Never skip this if you plan to store the jerky at room temperature for more than a few days. |
| Dried Dill Weed | Flavor Finisher | Apply this after patting the meat dry so it forms a crust rather than a sludge. |
This ingredient deep dive shows how the marinade works as a system. If you change one part, it affects the rest. For instance, if you use a low sodium pickle juice, you might need to add a teaspoon of kosher salt to ensure the cure works correctly. It’s all about balance.
Analyzing the Brine and Beef Selection
To make a truly easy dill pickle beef jerky, you need to start with the right ingredients. Don't just grab any beef on sale. The Eye of Round is the gold standard here because it’s incredibly lean and easy to slice into uniform strips.
You can also use Top Round or London Broil, but Eye of Round usually has the least amount of "waste" fat to trim off.
- 2 lbs (900g) eye of round roast: Trimmed of all visible fat. Why this? Lean meat prevents rancidity and ensures a longer shelf life.
- 1.5 cups (355ml) high-quality dill pickle juice: Why this? Provides the base acidity and salt for the tenderizing process.
- 2 tbsp white vinegar: Why this? Sharpens the tang and helps the pink salt penetrate the meat.
- 1 tbsp garlic powder: Why this? Adds depth that complements the herbal notes of the dill.
- 1 tsp onion powder: Why this? Provides a subtle sweetness to balance the vinegar.
- 1 tsp pink curing salt #1: Why this? Crucial for food safety and maintaining the meat's color.
- 1 tbsp Worcestershire sauce: Why this? Adds a fermented umami backbone to the marinade.
- 2 tbsp dried dill weed: Why this? The star of the show; used for the final flavor coating.
- 1 tsp mustard powder: Why this? Adds a tiny bit of heat and helps the dill stick to the meat.
- 1 tsp coarse black pepper: Why this? Cuts through the salt and adds a classic jerky bite.
| Original Ingredient | Substitute | Why It Works |
|---|---|---|
| Eye of Round | Flank Steak | More expensive, but has a very distinct grain that's great for jerky. |
| White Vinegar | Apple Cider Vinegar | Adds a fruitier note; good for a "sweet and sour" pickle vibe. |
| Pink Curing Salt | Celery Powder | A natural source of nitrates, though less precise for Long Term safety. |
| Garlic Powder | Fresh Minced Garlic | Note: Can become bitter during the long dry; use sparingly. |
If you happen to be making this for a crowd and want to serve it alongside some burgers, this jerky actually makes a wild garnish for a burger topped with my smashburger sauce recipe. The tang of the jerky cuts right through the richness of the beef.
Tools for a Smooth Drying Process

You don't need a professional grade laboratory to make this homemade dill pickle beef jerky, but a few specific tools make the job much faster. A sharp carving knife is non negotiable. If your knife is dull, you'll end up with ragged edges that dry unevenly.
I also highly recommend using a gallon sized Ziploc bag for the marinating process. It allows you to squeeze out all the air, ensuring every square centimeter of the beef is in contact with the brine.
For the drying itself, a dedicated dehydrator is best because of the consistent airflow. However, if you're using an oven, make sure it can go as low as 70°C (160°F). You'll also need a wire rack to set inside a baking sheet so the air can circulate under the meat.
If the meat sits directly on a flat surface, the bottom will stay soggy while the top burns.
Chef's Tip: Freeze your beef roast for about 90 minutes before slicing. It won't be a solid block of ice, but it will be firm enough that your knife won't slide around, allowing you to get those perfect 1/8 inch strips every single time.
step-by-step Drying Guide
- Prep the meat. Partially freeze the eye of round roast for 1-2 hours to firm up. Slice against the grain into uniform strips approximately 3mm to 6mm (1/8 to 1/4 inch) thick. Note: Slicing against the grain makes the jerky easier to chew.
- Mix the brine. In a large non reactive bowl or gallon sized Ziploc bag, combine the pickle juice, white vinegar, garlic powder, onion powder, pink curing salt, and Worcestershire sauce.
- Marinate the beef. Add the beef strips to the marinade, ensuring every piece is fully submerged. Refrigerate and marinate for 12 to 24 hours. Note: The longer you wait, the deeper the pickle flavor will penetrate.
- Dry the strips. Remove the beef from the marinade and pat each strip thoroughly dry with paper towels to remove excess surface moisture. Note: This is the most important step for achieving a snappy texture.
- Apply the seasoning. Mix the dried dill weed, mustard powder, and black pepper in a small bowl. Lightly dust both sides of the beef strips with this finishing blend.
- Arrange the trays. Arrange the strips on dehydrator trays without overlapping. Note: Air needs to flow freely between every piece for even drying.
- Dehydrate. Dehydrate at 71°C (160°F) for approximately 6 hours.
- Check for doneness. The jerky is done when it cracks but does not break when bent. until you see white fibers stretching at the bend.
- Cool down. Let the jerky cool at room temperature for 30 minutes before bagging. Note: This prevents condensation from forming in the bag, which would make the jerky soggy.
- Store. Place in an airtight container or vacuum sealed bag.
Fixing Texture and Salt Issues
One of the most common issues people face is the "Vinegar Burn." This happens when the marinade is too acidic or the meat sits in it for more than 24 hours. The beef starts to turn a greyish white and the texture becomes mushy.
If you notice this happening, shorten your next marinade time or dilute the pickle juice with a little bit of water.
Why Your Jerky Is Brittle
If your jerky snaps in half like a cracker, you've over dried it. This usually happens if the temperature was too high or the strips were sliced too thin for the 6 hour window. It's still edible (and great for crumbling over salads!), but it loses that classic chewy "jerky" feel.
| Problem | Root Cause | Solution |
|---|---|---|
| Soggy/Soft Jerky | Too much surface moisture or low temp | Pat dryer before seasoning; ensure dehydrator is at 71°C. |
| Too Salty | Brine was too concentrated | Soak the finished jerky in plain water for 5 mins, then re dry (last resort). |
| Gray/Dull Color | Omitted curing salt | Always use Pink Curing Salt #1 for that vibrant jerky look. |
Common Mistakes Checklist
- ✓ Always pat the meat bone dry with paper towels before adding the dry rub.
- ✓ Never overlap meat on the dehydrator trays; if they touch, they won't dry properly.
- ✓ Use a thermometer to verify your dehydrator is actually hitting 71°C (160°F).
- ✓ Trim every speck of white fat you see; fat does not dry, it spoils.
- ✓ Let the jerky cool completely before sealing it in a bag.
Flavor Twists and Meat Swaps
If you want to branch out from the standard dill pickle jerky recipe, there are several ways to tweak the profile. For a spicy dill pickle jerky recipe, I like to add 1 tablespoon of red pepper flakes or a teaspoon of cayenne to the marinade. The heat pairs beautifully with the vinegar.
If you're a hunter, a dill pickle deer jerky recipe is a fantastic way to use venison. Venison is naturally leaner than beef, so it takes to the brine exceptionally well. Just be aware that wild game often has a stronger flavor, so you might want to increase the garlic powder to 2 tablespoons to balance it out.
The "Hamburger" Variation
- Mix
- Incorporate the spices and a reduced amount of brine directly into the meat.
- Consistency
- Don't use too much liquid or the strips will fall apart.
- Fat Content
- Use 93/7 or 95/5 lean ground beef. Anything fattier will leave a pool of oil on your trays.
Scaling the Recipe
- Cutting it in half: Use a smaller bowl for the marinade. You can use half a teaspoon of pink salt by weighing it (roughly 3 grams).
- Doubling the batch: If you're doing 4 lbs of meat, don't double the liquid entirely. 2.5 cups of pickle juice is usually enough as long as the meat is packed tightly in the bag.
- Baking version: If using an oven, prop the door open slightly with a wooden spoon to let moisture escape.
Long Term Storage and Freshness
Properly dried jerky is quite stable, but it's not immortal. Because we used pink curing salt, this jerky will stay fresh in an airtight container at room temperature for about 1 to 2 weeks. However, for the best texture and safety, I always recommend storing it in the refrigerator.
In the fridge, it will last up to 2 months.
If you’ve made a massive batch, you can freeze it. Use a vacuum sealer if you have one to prevent freezer burn. It can stay in the freezer for up to 6 months. When you're ready to eat it, just let it sit on the counter for 20 minutes to take the chill off.
Zero Waste Tip: Don't throw away those tiny, broken shards at the bottom of the bag. I call those "jerky sprinkles." They are incredible when tossed into a bowl of popcorn or used as a salty topping for a baked potato.
You can even pulse them in a blender to make a smoky, pickle flavored seasoning salt.
Serving and Gifting Your Jerky
Jerky isn't just for gas stations anymore. If you're hosting a backyard BBQ, try putting a jar of this homemade dill pickle beef jerky on the table as an appetizer. It’s a great conversation starter because people are always surprised by how much it actually tastes like a pickle.
For gifting, I like to put the strips in a tall mason jar with a piece of parchment paper tucked inside. Tie a piece of twine around the lid and add a little tag that says "Artisanal Dill Pickle Jerky." It looks professional and makes a killer gift for Father's Day or for that friend who is always at the gym.
Myths About Jerky Making
- "You don't need curing salt if you're eating it fast." This is risky. Curing salt protects against botulism, which can grow in the low oxygen, warm environment of a dehydrator. Better safe than sorry.
- "Vinegar 'cooks' the meat entirely." While vinegar denatures the surface proteins, it doesn't kill all bacteria or remove enough moisture to make the meat shelf stable on its own. You still need the heat.
- "Jerky is high in calories." Not this version! At only 78 kcal per serving and over 13g of protein, it's one of the cleanest snacks you can make. It’s basically pure protein with some vinegar and herbs.
When you finally pull that first strip out and it gives you that perfect, resistant bend without snapping that’s the victory. The dill is fragrant, the vinegar is sharp, and the beef is chewy.
It’s a labor of love that takes a full day of waiting, but trust me, one bite and you'll never go back to the store-bought stuff again. Right then, let's get that beef in the brine!

Recipe FAQs
Can you marinate jerky in pickle juice?
Yes, it is an excellent base for curing jerky. The acidity in the pickle juice helps break down muscle fibers, creating a tender texture while infusing a deep, tangy flavor into the beef.
What is the secret to good jerky?
Patience during the dehydration process is everything. If you enjoyed mastering the temperature controlled drying process here, see how we apply similar precision to our Longhorn Parmesan Chicken to ensure consistent doneness every time.
What is a dirty dill pickle?
It refers to a pickle brine intensified with extra spices. In this recipe, the "dirty" element comes from adding garlic powder, onion powder, and coarse black pepper to the brine to mimic those bold, savory pickle flavors.
What can I do with leftover dill pickle juice?
Use it for brining other proteins or adding zip to sauces. It is a fantastic way to tenderize tougher cuts of meat before cooking, or you can stir a small amount into salad dressings to brighten up the flavor profile.
How to ensure the jerky doesn't spoil quickly?
Trim every visible speck of fat before slicing the roast. Since fat does not dehydrate and can turn rancid, removing all white tissue is the most important step for long term shelf stability.
How to tell if the jerky is finished dehydrating?
Bend a strip to check for a crack without snapping. When the meat reaches this texture after 6 hours at 160°F, it is properly dried while still retaining a slight, pleasant chew.
How to get the perfect thickness for slices?
Freeze your beef for 1 to 2 hours before you start slicing. Working with partially frozen meat makes it much easier to achieve uniform 1/8 to 1/4 inch strips, ensuring all pieces dry at the exact same rate.
Dill Pickle Jerky
Ingredients:
Instructions:
Nutrition Facts:
| Calories | 78 kcal |
|---|---|
| Protein | 13.4 g |
| Fat | 2.1 g |
| Carbs | 1.2 g |
| Fiber | 0.2 g |
| Sugar | 0.4 g |
| Sodium | 480 mg |
