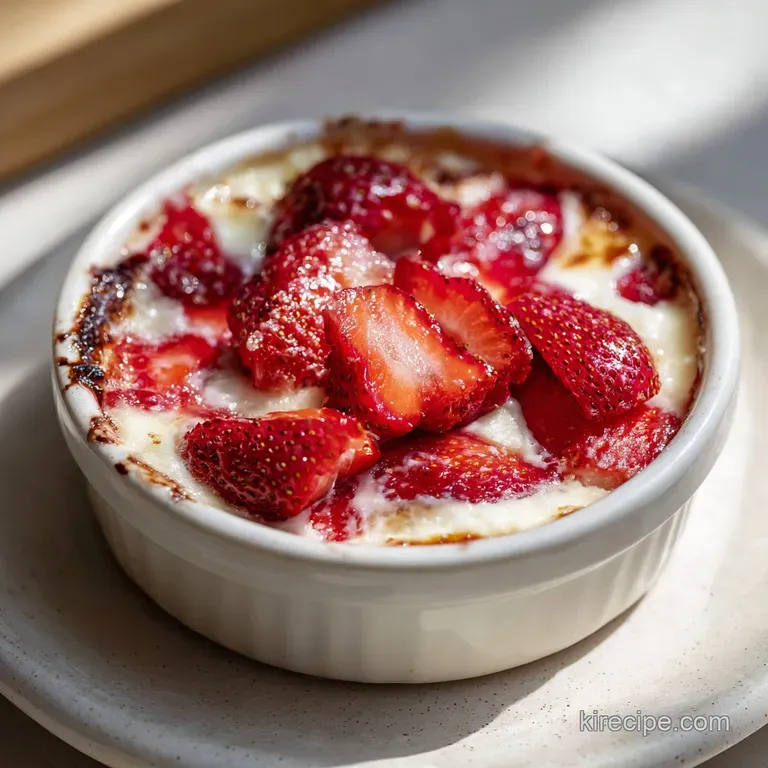
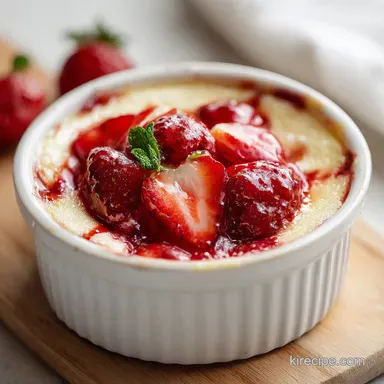
Strawberry Cheesecake Dump Cake: Creamy and Golden
- Time:10 minutes prep + 45 minutes cook = 55 minutes total
- Flavor/Texture Hook: Bubbling, tart strawberries paired with velvety cheesecake and a golden, biscuit like crust.
- Perfect for: Family Sunday dinners, potluck surprises, or when you need a high impact dessert without the stress.
- Create a Perfect Strawberry Cheesecake Dump Cake Recipe for Crowd-Pleasing Desserts
- What Sets This Bubbling Fruit Bake Apart From Others
- Precision Recipe Specs for Consistent Result Success
- Shopping List Breakdown for Your Next Grocery Run
- Essential Equipment Needed for the Perfect Golden Crust
- Key Steps to Layering Your Strawberry Cheesecake Masterpiece
- How to Fix Common Problems for a Flawless Bake
- Dietary Adaptations for Different Lifestyles and Needs
- Storage and Reheating Guidelines for Long Lasting Freshness
- Serving Suggestions for a Restaurant Quality Dessert Experience
- Myths About the Dump Cake Method
- Recipe FAQs
- 📝 Recipe Card
Create a Perfect Strawberry Cheesecake Dump Cake Recipe for Crowd Pleasing Desserts
Picture this: it is a warm Sunday afternoon, the kind where the sunlight hits the kitchen counter just right, and the family is starting to hover around the oven. There is a specific aroma that fills the house when butter melts into sugar and strawberries begin to burst. It is a scent that promises comfort.
I remember the first time I brought this dish to a neighborhood block party. I was worried it looked too "homestyle," but within twenty minutes, the ceramic dish was scraped clean.
People weren't just eating it; they were asking if I had spent all morning hovering over a bain marie to get that cheesecake swirl so right.
The magic of this strawberry cheesecake dump cake recipe lies in the contrast. You have that molten, jammy base of strawberries that provides a sharp, bright acidity. Then, you hit those pockets of creamy, vanilla scented cheesecake that offer a cooling, velvety mouthfeel. Finally, there is the crust.
It is not just "cakey" when done with precision, it develops a crunch that shatters slightly under the fork, providing the necessary structural integrity to hold up all that fruit. It is a dessert that feels celebratory but respects your time, which is exactly why it has become a staple in my kitchen.
We are going to move away from the "just throw it in" mentality often associated with dump cakes. While the name implies a lack of effort, a few scientific tweaks like how we handle the fat and how we aerate the dairy will turn this from a basic cobbler style bake into something truly remarkable.
We are looking for those distinct ribbons of cheesecake and a topping that is golden brown rather than dusty. Trust me, once you see those bubbles of red fruit peeking through a mahogany gold crust, you will understand why this is the only version of this recipe I ever make.
What Sets This Bubbling Fruit Bake Apart From Others
The success of this bake is rooted in how we manage moisture and fat. In many dump cakes, the top stays dry and floury because the butter doesn't reach every corner. We solve that through a specific grating technique.
On top of that,, the inclusion of a stabilized cream cheese layer prevents the "mush factor" that plagues lesser recipes. By adding an egg and sugar to the cream cheese, we are essentially baking a crustless cheesecake directly into the fruit.
- Lipid Distribution: Grating cold butter creates thousands of tiny fat "islands" that melt at a controlled rate, ensuring the cake mix is hydrated evenly without becoming greasy.
- Starch Gelatinization: The lemon juice in the strawberries doesn't just add flavor; the acidity helps the fruit pectins set, preventing the base from becoming a watery mess.
- Protein Aeration: Beating the cream cheese with an egg introduces tiny air bubbles that expand in the oven, giving the cheesecake ribbons a light, soufflé like lift.
- Thermal Barrier: The cream cheese layer acts as a buffer between the wet fruit and the dry cake mix, allowing the bottom of the crust to steam cook while the top crisps.
| Method | Time | Texture Result | Best For |
|---|---|---|---|
| The Precision Method | 55 minutes | Shatter crisp top, velvety ribbons | Dinner parties, holidays |
| The Fast Melt Method | 50 minutes | Soft, cobbler like topping | Quick weeknight cravings |
| Classic Stir In | 60 minutes | Uniform, cake like density | Traditionalists who like sponge |
This comparison highlights why the precision method using grated butter and a whipped cheese layer is superior for those who value textural complexity. While the fast melt method (pouring melted butter) is quicker, it often leads to "grease pools" and missed dry spots in the cake mix.
Precision Recipe Specs for Consistent Result Success
Success in baking is often a game of numbers. While this recipe is forgiving, sticking to these exact specifications ensures that your strawberry cheesecake dump cake recipe turns out exactly as described: bubbling, creamy, and golden. If you enjoy the tang of mascarpone in your bakes, you should definitely try my Berry Chantilly Cake for your next summer party, as it uses similar berry and cream physics.
| Component | Science Role | Pro Secret |
|---|---|---|
| Cream Cheese | Provides structural fat and tangy contrast | Use full fat only; low-fat has too much water and will weep. |
| Large Egg | Acts as a binder and leavening agent | Ensure it is room temperature to emulsify properly with the cheese. |
| Cold Butter | Creates the "shatter" texture in the crust | Freeze the stick for 10 minutes before grating for perfect shreds. |
| Lemon Juice | Brightens flavor and assists pectin set | Freshly squeezed juice provides a sharper "pop" than bottled. |
The interaction between the granulated sugar and the cream cheese is also vital. The sugar crystals cut into the cheese during the beating process, creating those microscopic air pockets we talked about. This is why we don't just "stir" the cheese; we whip it. For those who prefer a stone fruit vibe, the Peaches and Cream Cake offers a similar velvety sponge experience with adjusted moisture ratios.
Shopping List Breakdown for Your Next Grocery Run
Before you head to the store, make sure you are looking for these specific items. Quality varies significantly between brands, and for a dish with so few ingredients, each one needs to pull its weight.
- 42 oz strawberry pie filling: You will need two 21 oz cans. Look for brands that list "strawberries" as the first ingredient, not corn syrup.
- 1 tsp lemon juice: One small lemon is plenty. Fresh acidity is the key to cutting through the sweetness. Why this? It balances the sugar in the pie filling and helps the fruit set.
- 8 oz full fat cream cheese: One standard block. Do not use the whipped tub variety. Why this? The block version has the density required for distinct cheesecake ribbons.
- 0.25 cup granulated sugar: Standard white sugar works best here.
- 1 large egg: This binds the cheesecake layer so it doesn't disappear into the fruit.
- 1 tsp vanilla extract: Pure extract provides a much deeper aromatic profile than imitation.
- 15.25 oz yellow cake mix: One standard box. You can also use white cake mix, but yellow offers a richer, buttery flavor.
- 0.75 cup salted butter: This should be very cold. Why this? Cold butter is essential for the grating technique that creates the perfect crust.
| Original Ingredient | Substitute | Why It Works |
|---|---|---|
| Yellow Cake Mix | White Cake Mix | Similar starch content. Note: Results in a slightly less "buttery" flavor profile. |
| Salted Butter | Unsalted Butter + 1/4 tsp salt | Same fat content. Note: Salt is necessary to highlight the strawberry flavors. |
| Full Fat Cream Cheese | Mascarpone | High fat content. Note: Will be richer and less tangy than traditional cream cheese. |
Essential Equipment Needed for the Perfect Golden Crust
You don't need a professional kitchen, but two specific tools make this recipe foolproof. First, an electric handheld mixer is non negotiable for the cheesecake layer. You simply cannot get enough air into the cheese by hand to achieve that light, velvety texture. Second, a box grater.
This is the "secret weapon" for the topping.
Chef's Tip: If you don't have a box grater, use a vegetable peeler to create thin "shavings" of cold butter. It's more tedious but far better than melting it.
We also use a 9x13-inch (approx. 23x33 cm) baking dish. Glass or ceramic is preferred over metal here, as they distribute heat more evenly, which prevents the edges of the strawberries from scorching before the center is cooked through.
Key Steps to Layering Your Strawberry Cheesecake Masterpiece

- Preheat your oven to 350°F (175°C). Ensure the rack is in the center position for even browning.
- Spread both cans of strawberry pie filling into the bottom of an ungreased 9x13-inch baking dish.
- Stir the 1 tsp of lemon juice into the strawberries to brighten the flavor. until well combined and evenly distributed.
- In a medium bowl, beat the softened cream cheese, 0.25 cup sugar, egg, and vanilla extract using an electric mixer. Note: This aeration is what creates the "cheesecake" mouthfeel.
- Drop spoonfuls of this mixture over the strawberry base.
- Use a butter knife to gently swirl the cheese into the berries. until you see distinct red and white ribbons.
- Sprinkle the dry cake mix evenly over the fruit and cheese. Note: Do not pack it down; keep it light and airy.
- Grate the 0.75 cup of cold butter directly over the cake mix. until the surface is completely covered in butter shreds.
- Bake for 45 minutes. Note: Check at 35 minutes to ensure the top isn't browning too quickly.
- Remove from oven until the topping is mahogany gold and the filling is bubbling.
Let the dish rest for at least 15 minutes before serving. This allows the fruit pectins to firm up, ensuring you get a clean scoop rather than a soupy mess. The residual heat will continue to "set" the cheesecake layer, making it even more velvety.
How to Fix Common Problems for a Flawless Bake
Even with a simple recipe, things can go sideways. The most common complaint with dump cakes is the "dry flour patch." This happens when the butter isn't distributed well enough to hydrate the cake mix.
If you see white powder halfway through baking, don't panic just add a few thin slivers of butter to those spots and keep going.
Why Your Crust Stays Dusty
This is almost always caused by uneven butter distribution. When you pour melted butter, it tends to soak into some areas and leave others dry. By grating the butter, we ensure every square inch of the cake mix has a fat source to help it brown and hydrate.
Why Your Cheesecake Layer Disappeared
If you swirled the cream cheese too vigorously, it might have emulsified into the strawberry filling rather than staying as distinct pockets. The goal is to see "clouds" of white in a sea of red, not a pink mush. Next time, use fewer knife strokes.
| Problem | Root Cause | Solution |
|---|---|---|
| Soggy Crust | Butter was too warm or melted | Freeze butter for 10 minutes before grating to keep it "shredded." |
| Runny Filling | Not enough cooling time | Let the cake rest for 15-20 minutes after baking to allow it to set. |
| Burnt Edges | Oven hot spots or dark metal pan | Use a glass dish and rotate the pan halfway through the 45 minutes. |
Common Mistakes Checklist:
- ✓ Using "cold" cream cheese (it must be softened to beat smoothly).
- ✓ Forgetting to add the egg (the cheese layer will be too liquid without it).
- ✓ Over swirling the cheesecake ribbons into the fruit.
- ✓ Using margarine instead of real butter (margarine has too much water).
- ✓ Skipping the resting period after the cake comes out of the oven.
Dietary Adaptations for Different Lifestyles and Needs
While the classic version is hard to beat, we can tweak the ingredients for various needs. For a gluten-free treat, simply swap the yellow cake mix for a certified gluten-free yellow or white cake mix.
Most gluten-free mixes actually work very well in dump cakes because the high moisture from the fruit prevents the grit often found in GF bakes.
For a Lighter Version
If you want to reduce the fat content slightly, you can use Neufchâtel cheese instead of full fat cream cheese. It has about 1/3 less fat but a similar texture. However, avoid "fat free" cream cheese entirely; it is stabilized with gums that do not react well to high oven temperatures and can turn rubbery.
For a Spiced Twist
To give this a "holiday" feel, add a half teaspoon of ground cardamom or cinnamon to the dry cake mix before sprinkling it over the fruit. Cardamom and strawberry are a match made in heaven the floral notes of the spice perfectly complement the tartness of the berries.
Storage and Reheating Guidelines for Long Lasting Freshness
Because of the dairy and fruit content, this cake needs to be handled with care once it cools. Store any leftovers in the refrigerator, covered tightly with plastic wrap or in an airtight container, for up to 4 days. I actually think it tastes even better the next morning when the flavors have had time to meld.
To reheat, the oven is your best friend if you want to preserve the crust's texture. Place a portion in an oven safe dish at 300°F (150°C) for about 10 minutes.
The microwave works in a pinch (about 30-45 seconds), but be warned: the crust will lose its shatter and become soft. For freezing, wrap individual portions in foil and place them in a freezer bag for up to 3 months. Thaw in the fridge overnight before reheating.
Zero Waste Tip: If you have a few spoonfuls of the strawberry filling left in the can, don't toss it! Stir it into your morning yogurt or use it as a topper for oatmeal. The lemon brightened strawberries are versatile enough for breakfast too.
Serving Suggestions for a Restaurant Quality Dessert Experience
Presentation is where you turn a simple bake into a "wow" moment. While you can eat this straight out of the pan, serving it in wide, shallow bowls allows you to see the layers. A scoop of high-quality vanilla bean ice cream is the classic pairing; the cold cream melting into the warm strawberry sauce creates a "strawberries and cream" effect that is irresistible.
For a Refreshing Twist
Top the warm cake with a few cracks of fresh black pepper and a sprig of mint. It sounds strange, but black pepper actually amplifies the flavor of strawberries, making them taste "redder." A drizzle of thick balsamic glaze can also add a sophisticated acidity that cuts through the richness of the cheesecake.
If you are serving this at a party, consider a "topping bar" where guests can add their own whipped cream, toasted almonds, or fresh strawberry slices. The toasted almonds add a much needed crunch that complements the buttery crust.
Whatever you do, make sure you serve it warm that is when the cheesecake layer is at its most velvety and the strawberry scent is most potent.
Myths About the Dump Cake Method
Myth 1: You have to stir the cake mix into the fruit. Absolutely not. In fact, if you stir it, you will end up with a dense, gummy sponge rather than a crisp topping. The dry mix is supposed to sit on top so it can be hydrated by the melting butter and the steam from the fruit below.
This creates the "biscuit" texture we are looking for.
Myth 2: Melted butter is the same as cold butter. Science says otherwise! Melted butter immediately soaks into the flour, often creating "clumps." Grated cold butter sits on top and melts slowly, allowing the flour in the cake mix to brown before it fully saturates.
This is the secret to a crust that shatters rather than one that is just soft.
Myth 3: Any fruit filling works exactly the same. While you can use other fruits, strawberries have a high water content and specific acidity. This is why we add the lemon juice and why the resting period is so crucial.
A thicker filling, like apple, might not provide enough steam to hydrate the cake mix, whereas strawberry is perfect for this "precision" layering technique.

Recipe FAQs
Does strawberry cheesecake dump cake need to be refrigerated?
Yes, store leftovers in the refrigerator. Because this recipe contains cream cheese and eggs, it must be kept chilled in an airtight container to remain safe and fresh for up to 4 days.
Why don't you mix dump cakes?
Mixing ruins the signature texture. The point of a dump cake is for the butter and cake mix to create a distinct, crust like topping over the fruit layer; if you stir it, you end up with a gummy, cake like batter instead of a crispy finish.
What are the ingredients in this strawberry cheesecake dump cake?
You need eight specific items. The recipe calls for two 21 oz cans of strawberry pie filling, 1 tsp lemon juice, 8 oz softened cream cheese, 0.25 cup granulated sugar, 1 large egg, 1 tsp vanilla extract, one 15.25 oz box of yellow cake mix, and 0.75 cup cold salted butter.
How to make dump cake better?
Grate your cold butter using a box grater. Distributing the butter as small shreds rather than thin slices ensures even coverage across the dry cake mix, which prevents those dreaded dry, powdery spots and creates a uniform mahogany gold crust.
Is it true I should stir the cream cheese into the pie filling completely?
No, this is a common misconception. You want to drop spoonfuls of the cheese mixture and gently swirl it to create ribbons, which keeps the cheesecake flavor concentrated rather than diluted into the fruit.
How to ensure the topping reaches that perfect golden crunch?
Bake until the edges bubble vigorously. Keep the oven at 350°F (175°C) and do not pull it out until the topping reaches a deep, dark golden color; if you enjoyed achieving this perfect crispy caramelized texture here, you can apply the same patience for browning to other baked fruit desserts.
Can I use a different fruit for this cheesecake recipe?
Stick to the specified strawberry pie filling for the best results. Changing the fruit can alter the moisture balance and acidity of the dump cake, potentially affecting how the cake mix interacts with the liquid during the 45-minute bake time.
Strawberry Cheesecake Dump Cake
Ingredients:
Instructions:
Nutrition Facts:
| Calories | 388 kcal |
|---|---|
| Protein | 3.5 g |
| Fat | 17.4 g |
| Carbs | 56.2 g |
| Fiber | 1.2 g |
| Sugar | 34.8 g |
| Sodium | 392 mg |
