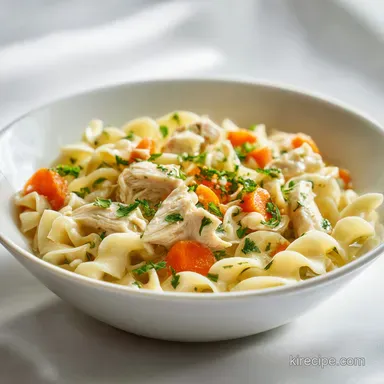
Chicken and Noodles: Creamy and Comforting

- Time: Active 15 minutes, Passive 25 minutes, Total 40 minutes
- Flavor/Texture Hook: Silky, savory broth with tender shredded chicken and chewy, thick noodles.
- Perfect for: Busy weeknights when you need high effort flavor with minimal cleanup.
Comfort in a Bowl: Chicken and Noodles
We've all been there: you’re craving a massive bowl of cozy comfort, but you end up with a pot of grey, watery liquid and noodles so soft they basically dissolve when they hit your tongue. It's a total buzzkill.
Most recipes tell you to just throw everything in and hope for the best, but that's exactly how you get rubbery meat and mushy pasta. I used to think the "dump and go" method was the only way for a weeknight, but after one too many bowls of bland "noodle soup" that was supposed to be a thick "noodle dinner," I realized the order of operations is everything.
This specific version of Chicken and Noodles focuses on building layers of flavor in a fraction of the time. We aren't just boiling meat; we're searing it. We aren't just adding water; we're using bone broth and aromatics to create a base that tastes like it spent all Sunday on the stove. The trick lies in the timing.
By cooking the chicken first to reach that melt in-your mouth texture and then adding the noodles for a secondary, shorter pressure cycle, we ensure every component is cooked precisely right. No more guessing, and definitely no more mush.
You can expect a dish that is thick enough to eat with a fork but silky enough to require a piece of crusty bread for dipping. It’s the kind of meal that makes the whole house smell like a hug.
If you've struggled with "burn" notices on your pot or ended up with a thin, greasy sauce, this method is your targeted fix. We’re going to use a simple slurry at the end to turn the cooking liquid into a glossy, restaurant quality gravy that clings to every single noodle.
Key Metrics for Success
The Searing Step: Searing the chicken thighs for 2 minutes per side isn't just for looks. It creates a deep, savory crust that dissolves into the broth, adding a complex base that raw chicken simply cannot provide.
Two Phase Cooking: Running an 8 minute cycle for the meat and then a 5 minute cycle for the noodles prevents the pasta from over hydrating. This keeps the noodles "bouncy" rather than grainy.
Starch Management: Using frozen thick egg noodles is a secret weapon. They contain more moisture and starch than dried pasta, which helps naturally thicken the liquid as they cook.
The Slurry Finish: Whisking flour into heavy cream before adding it to the hot liquid prevents clumping. It creates a stable emulsion that stays velvety even as it cools.
| Method | Time | Texture | Best For |
|---|---|---|---|
| Instant Pot | 40 minutes | Firm noodles, juicy meat | Fast weeknight hunger |
| Slow Cooker | 6 hours | Very soft, fall apart meat | Set and forget mornings |
| Stovetop | 1 hours 15 mins | Fully controlled thickness | Weekend slow cooking |
Choosing the right method depends entirely on your schedule, but the Instant Pot is the clear winner for maintaining the structural integrity of the noodles while still getting that long simmered flavor.
Selecting the Best Ingredients
| Ingredient | Science Role | Pro Secret |
|---|---|---|
| Chicken Thighs | Fat & Collagen | Use thighs because they don't dry out during the high pressure cycle like breasts do. |
| Frozen Egg Noodles | Structural Starch | These are denser than dry pasta and can withstand the pressure without turning into a paste. |
| Bone Broth | Gelatin Base | Provides a "mouthfeel" that regular stock lacks, making the sauce feel richer without extra fat. |
| Heavy Cream | Emulsification | The fat in the cream binds with the flour to create a glossy, stable sauce that won't separate. |
Getting the right ingredients is half the battle. For the aromatics, you'll need 1 large yellow onion, 3 medium carrots, and 2 stalks of celery. This "mirepoix" is the foundation of almost every great soup or stew.
Don't skip the 4 cloves of minced garlic either; it adds a pungent backnote that cuts through the richness of the cream.
For the seasoning, we're using 1 tsp each of dried thyme and rubbed sage. Sage is the classic "poultry" herb that gives this dish its traditional holiday meal aroma. You'll also need 2 bay leaves, which should be removed before serving.
The 1.5 lbs of boneless skinless chicken thighs provide the protein, while 4 cups of low sodium chicken bone broth provide the liquid. Note that using low sodium broth is important so you can control the final saltiness yourself with the 1 tsp of sea salt and 1/2 tsp of cracked black pepper.
Finally, the finishing touches include 16 oz of frozen thick egg noodles (look for the bags in the freezer section, often near the frozen bread dough), 1/2 cup of heavy cream, and 1/4 cup of all purpose flour for the thickener.
A 1/2 cup of frozen peas adds a pop of color and sweetness at the end, and 1 tbsp of fresh parsley brings a much needed hit of brightness.
Tools for the Job
You’ll definitely need a 6 quart or 8 quart electric pressure cooker for this. A wooden spoon is also essential for the deglazing step; metal spoons can sometimes scratch the bottom of your inner pot, and you really need to be able to scrape up those browned bits.
A small whisk and a separate bowl are required for the slurry to ensure there are no flour lumps.
If you find yourself making a lot of poultry based comfort food, you might also enjoy checking out this Slow Cooker Chicken and Gravy which uses similar flavor profiles but a different cooking timeline. For this specific recipe, having a pair of tongs to flip the chicken during the sear and two forks for shredding the meat later will make your life much easier.
Perfect Cooking Step Guide

- Set the Instant Pot to SAUTE. Melt the 2 tbsp of butter and add the diced onion, carrots, and celery. Cook for 5 minutes until the onions are translucent and the carrots begin to soften. Note: This builds the aromatic base.
- Stir in the 4 cloves of garlic, 1 tsp thyme, and 1 tsp sage. Cook for 1 minute until you smell a toasted, herbal aroma.
- Push the vegetables to the side of the pot. Add the 1.5 lbs of chicken thighs whole and sear for 2 minutes per side until a golden brown crust forms on the meat.
- Pour in 1/2 cup of the chicken broth. Use your wooden spoon to deglaze the bottom, scraping until the pot surface is completely smooth. Note: This prevents the "Burn" error.
- Add the remaining 3.5 cups of broth, 1 tsp salt, and 1/2 tsp pepper. Close the lid and set to Manual/High Pressure for 8 minutes.
- When the timer finishes, perform a Quick Release. Remove the chicken to a plate and shred into large chunks using two forks to pull the fibers apart.
- Return the shredded chicken to the pot. Add the 16 oz of frozen egg noodles and stir until they are fully submerged in the liquid.
- Close the lid and set to Manual/High Pressure for 5 minutes. Perform a Quick Release immediately to stop the noodles from overcooking.
- In a small bowl, whisk 1/2 cup heavy cream and 1/4 cup flour. Set the pot back to SAUTE and stir in the slurry and 1/2 cup frozen peas.
- Simmer for 2-3 minutes until the sauce is thick enough to coat the back of a spoon. Remove bay leaves and garnish with parsley.
Fixing Common Meal Mistakes
Why Your Sauce Is Watery
If your Chicken and Noodles looks more like a soup than a thick noodle dish, the most likely cause is an incomplete simmer at the end. The flour in the slurry needs to reach a specific temperature to "gelatinize" and thicken the liquid. If you just stir it in and turn the pot off, it won't work.
You must use the SAUTE function and let it bubble for at least 2 minutes.
Why the Noodles are Gummy
Gummy noodles usually happen if you let the pot sit on "Keep Warm" for too long after the second pressure cycle. The residual heat continues to cook the starch. As soon as that 5 minute timer hits zero, you need to vent the steam and get those noodles moving. Also, ensure you are using frozen thick noodles.
If you substitute dry pasta using the same time, they will likely disintegrate.
| Problem | Root Cause | Solution |
|---|---|---|
| Burn Message | Bits stuck to bottom | Deglaze thoroughly with broth before pressure cooking. |
| Tough Chicken | Using chicken breast | Switch to thighs; they handle high pressure much better. |
| Bland Flavor | Not enough salt | Adjust seasoning at the very end after the cream is added. |
Understanding the protein structure is key here. If you're interested in how different cooking methods affect chicken, you might see similarities in this Korean Chicken Rice Bowl which also relies on over high heat techniques for the best texture.
Common Mistakes Checklist
- ✓ Never skip the deglazing step; even a tiny bit of stuck onion can trigger the burn sensor.
- ✓ Always use a Quick Release for the noodles; a Natural Release will turn them into mush.
- ✓ Don't shred the chicken too finely; large chunks provide a better contrast to the soft noodles.
- ✓ Whisk the flour and cream in a separate bowl first to avoid "flour pearls" in your sauce.
- ✓ Ensure the noodles are submerged; any noodles sticking out of the liquid won't cook evenly.
Simple Ways to Change Flavors
To Achieve the Perfect "Chew"
If you like your noodles with even more bite, you can reduce the second pressure cycle to 4 minutes. This works especially well if you plan on reheating the dish later, as the noodles will soften slightly every time they are warmed up.
For those who prefer a very soft, "dumpling style" noodle, stick to the 5 minutes or even add a 2 minute natural release.
To Save 30 Minutes
If you're in a massive rush, you can use a pre cooked rotisserie chicken. Skip the chicken searing and the first 8 minute pressure cycle. Simply sauté your veggies, add the broth, seasonings, shredded rotisserie chicken, and frozen noodles all at once.
Set the pressure for 5 minutes and proceed with the slurry. It's a lifesaver on soccer nights.
Dietary Swaps
While the classic version is hard to beat, sometimes you need to adjust for what's in the pantry or for dietary needs.
| Original Ingredient | Substitute | Why It Works |
|---|---|---|
| Heavy Cream | Full fat Coconut Milk | Provides similar creaminess. Note: Will add a slight tropical flavor. |
| All Purpose Flour | Cornstarch (use half) | Thickens well. Note: Makes the sauce look more translucent/glossy. |
| Chicken Thighs | Turkey Breast | Great for post holiday leftovers. Note: Can be slightly drier than thighs. |
If you decide to use cornstarch instead of flour, remember to mix it with cold water or cream first. Cornstarch "clumps" instantly if it hits hot liquid directly, creating little clear jelly balls that are definitely not what we want in our noodles.
Safe Storage and Reheating
Storage: You can keep these Chicken and Noodles in the fridge for up to 4 days. However, be warned: the noodles act like little sponges. They will continue to soak up the sauce as they sit. When you open the container the next day, it might look like a solid mass. Don't panic!
Reheating: To bring that silky texture back, add a splash of chicken broth or a tablespoon of water before microwaving or heating on the stove. This thins the sauce back out to its original glory.
Heat in 30 second intervals, stirring in between, to ensure the middle gets hot without overcooking the edges of the pasta.
Freezing: This dish actually freezes quite well because the frozen noodles are already used to the process. Freeze in airtight containers for up to 3 months. To serve, thaw in the fridge overnight and reheat on the stovetop with extra broth.
Zero Waste Tip: Don't toss those celery leaves! Chop them up along with the parsley for the garnish. They have an intense celery flavor that adds a professional touch. Also, if you have leftover bones from the thighs, save them in a bag in the freezer to make your own bone broth later.
Best Ways to Serve
This is a heavy, heart warming dish, so it pairs best with things that offer a bit of crunch or acidity. A simple green salad with a sharp lemon vinaigrette is my go to. It cuts through the richness of the heavy cream and butter perfectly.
If you're feeling extra indulgent, a side of honey glazed carrots or some roasted broccoli provides a nice color contrast to the creamy white sauce.
For a true "Sunday Dinner" feel, serve this over a pile of mashed potatoes. Yes, it's carbs on carbs, but in some parts of the Midwest, that is the only way to eat Chicken and Noodles. The sauce acts as a gravy for the potatoes, and it's incredibly filling. If you go this route, maybe skip the bread!
If you're looking for a different kind of noodle experience that's a bit lighter, you might enjoy learning about Chicken Long Rice which offers a completely different texture using clear noodles. But for those nights when only the thick, floury, comforting traditional style will do, this Instant Pot method is the absolute gold standard.
To Prevent the "Burn" Error
The "Burn" notice is the bane of every pressure cooker owner's existence. It usually happens because starch or sugar has settled on the bottom of the pot and caramelized too quickly.
By deglazing with that first 1/2 cup of broth and really scrubbing the bottom with your wooden spoon, you lift those particles into the liquid where they can safely circulate. This is the single most important step for a stress free cook.
For a Zesty Kick
If the dish feels too "heavy" for your palate, stir in a teaspoon of fresh lemon juice or a dash of apple cider vinegar right at the end. This acidity acts as a "brightness" tool, waking up the flavors of the thyme and sage without making the dish taste sour.
It’s a trick chefs use to balance out high fat sauces, and it works wonders here.
The "Better Than Dining Out" Presentation
To make this look as good as it tastes, don't just stir the parsley in. Save half of it to sprinkle on top right before the bowl hits the table. The contrast of the bright green against the creamy noodles makes it look fresh rather than "stewed." A final crack of fresh black pepper over the top also adds a visual and flavor pop that pre ground pepper just can't match.
Kitchen Myths Debunked
Myth 1: You must use "Cream of" soups for thickness. Many people think that classic Chicken and Noodles requires a can of condensed soup to get that specific texture. That's simply not true.
The combination of the starch from the frozen noodles and a simple flour/cream slurry creates a much cleaner, more vibrant flavor profile without the metallic aftertaste or excessive sodium found in canned goods.
Myth 2: Searing meat "seals in the juices." This is a very common misconception. Searing does not create a waterproof barrier; moisture is actually lost during the searing process.
However, we sear for the Maillard reaction the chemical reaction between amino acids and reducing sugars that gives browned food its distinctive flavor. We aren't sealing juice; we are building a flavor profile that water and pressure alone can't achieve.
Myth 3: Frozen noodles are just "bad" fresh noodles. In the case of this recipe, frozen thick egg noodles are actually superior to fresh or dried. Fresh noodles are too delicate and would turn to mush under pressure. Dried noodles are too thin and lack the "chew" required for a traditional hearty dish.
Frozen noodles are flash frozen, which preserves their cellular structure, allowing them to hydrate perfectly in the 5 minute pressure window.
If you want X, do Y If you want a thicker, "pot pie" style consistency, increase the flour in your slurry to 1/3 cup. If you want a lighter, soup like version, omit the slurry entirely and add an extra cup of broth.
If you want a smoky flavor, swap the sea salt for smoked salt or add a pinch of smoked paprika to the vegetable sauté.
With these tips and the specific timing of the pressure cooker, you're ready to make a batch of Chicken and Noodles that would make any grandmother proud. It's fast, it's efficient, and most importantly, it's incredibly flavorful. Happy cooking!

Recipe FAQs
How to avoid mushy noodles?
Use a two-stage pressure cooking method. By pressure cooking the chicken first for 8 minutes and then adding the noodles for a separate 5-minute cycle, you ensure the pasta retains its signature chewy texture without disintegrating.
Can I use fresh noodles instead of frozen?
No, stick to frozen thick egg noodles for this recipe. Fresh noodles contain higher moisture and will overcook and dissolve during the pressure cooking process, ruining the consistency of the dish.
How to get a deeper flavor in the sauce?
Deglaze the pot thoroughly after searing the chicken. Pouring 1/2 cup of chicken broth over the brown bits left on the bottom of the pot creates a foundation of flavor that is essential for a rich, velvety sauce.
How to thicken the sauce properly?
Whisk the heavy cream and flour into a smooth slurry before adding it to the pot. Once you set the Instant Pot to SAUTE, this mixture will simmer into a glossy, thick coating that clings perfectly to the noodles.
Is it true I can substitute chicken breast for thighs?
No, this is a common misconception regarding cook times. Chicken thighs are more forgiving and hold their moisture during the 8-minute pressure cycle, whereas breasts would become dry and stringy under the same conditions.
How to ensure the vegetables stay tender but not soft?
Sauté the aromatics for exactly 5 minutes until the onions are translucent. If you enjoyed learning how to balance heat and timing here, see how we use fresh herbs to build a similar aromatic base in other soul warming recipes.
How to store leftovers without the sauce separating?
Cool the dish completely before transferring to an airtight container. When reheating, add a small splash of extra chicken broth to loosen the sauce, as the flour and cream base will naturally thicken significantly in the refrigerator.
Instant Pot Chicken And Noodles
Ingredients:
Instructions:
Nutrition Facts:
| Calories | 641 calories |
|---|---|
| Protein | 44.9g |
| Fat | 27.3g |
| Carbs | 54.5g |
| Fiber | 3.7g |
| Sugar | 4.8g |
| Sodium | 550mg |
